15.6.1 API 客户端封装
Godot 前端需要与 FastAPI 后端进行 HTTP 通信。我们创建一个 API 客户端脚本api_client.gd,封装所有的 API 调用,并将其设置为 AutoLoad(自动加载)单例,让其他脚本可以方便地使用。
API 客户端使用 Godot 的 HTTPRequest 节点来发送 HTTP 请求。HTTPRequest 是一个异步节点,发送请求后不会阻塞游戏,而是通过信号通知请求完成。这样可以保证游戏的流畅性,即使网络延迟较高也不会卡顿。我们使用信号机制来通知其他脚本 API 响应,而不是使用 await,这样可以让多个脚本同时监听同一个 API 响应。
# api_client.gd
extends Node

# 信号定义
signal chat_response_received(npc_name: String, message: String)
signal chat_error(error_message: String)
signal npc_status_received(dialogues: Dictionary)
signal npc_list_received(npcs: Array)

# HTTP请求节点
var http_chat: HTTPRequest
var http_status: HTTPRequest
var http_npcs: HTTPRequest

func _ready():
    # 创建HTTP请求节点
    http_chat = HTTPRequest.new()
    http_status = HTTPRequest.new()
    http_npcs = HTTPRequest.new()

    add_child(http_chat)
    add_child(http_status)
    add_child(http_npcs)

    # 连接信号
    http_chat.request_completed.connect(_on_chat_request_completed)
    http_status.request_completed.connect(_on_status_request_completed)
    http_npcs.request_completed.connect(_on_npcs_request_completed)

# ==================== 对话API ====================
func send_chat(npc_name: String, message: String) -> void:
    """发送对话请求"""
    var data = {
        "npc_name": npc_name,
        "message": message
    }

    var json_string = JSON.stringify(data)
    var headers = ["Content-Type: application/json"]

    var error = http_chat.request(
        Config.API_CHAT,
        headers,
        HTTPClient.METHOD_POST,
        json_string
    )

    if error != OK:
        print("[ERROR] 发送对话请求失败: ", error)
        chat_error.emit("网络请求失败")

func _on_chat_request_completed(_result: int, response_code: int, _headers: PackedStringArray, body: PackedByteArray) -> void:
    """处理对话响应"""
    if response_code != 200:
        print("[ERROR] 对话请求失败: HTTP ", response_code)
        chat_error.emit("服务器错误: " + str(response_code))
        return

    var json = JSON.new()
    var parse_result = json.parse(body.get_string_from_utf8())

    if parse_result != OK:
        print("[ERROR] 解析响应失败")
        chat_error.emit("响应解析失败")
        return

    var response = json.data

    if response.has("success") and response["success"]:
        var npc_name = response["npc_name"]
        var msg = response["message"]
        print("[INFO] 收到NPC回复: ", npc_name, " -> ", msg)
        chat_response_received.emit(npc_name, msg)
    else:
        chat_error.emit("对话失败")

# ==================== NPC状态API ====================
func get_npc_status() -> void:
    """获取NPC状态"""
    # 检查是否正在处理请求
    if http_status.get_http_client_status() != HTTPClient.STATUS_DISCONNECTED:
        print("[WARN] NPC状态请求正在处理中,跳过本次请求")
        return

    var error = http_status.request(Config.API_NPC_STATUS)

    if error != OK:
        print("[ERROR] 获取NPC状态失败: ", error)

func _on_status_request_completed(_result: int, response_code: int, _headers: PackedStringArray, body: PackedByteArray) -> void:
    """处理NPC状态响应"""
    if response_code != 200:
        print("[ERROR] NPC状态请求失败: HTTP ", response_code)
        return

    var json = JSON.new()
    var parse_result = json.parse(body.get_string_from_utf8())

    if parse_result != OK:
        print("[ERROR] 解析NPC状态失败")
        return

    var response = json.data

    if response.has("dialogues"):
        var dialogues = response["dialogues"]
        print("[INFO] 收到NPC状态更新: ", dialogues.size(), "个NPC")
        npc_status_received.emit(dialogues)

# ==================== NPC列表API ====================
func get_npc_list() -> void:
    """获取NPC列表"""
    var error = http_npcs.request(Config.API_NPCS)

    if error != OK:
        print("[ERROR] 获取NPC列表失败: ", error)

func _on_npcs_request_completed(_result: int, response_code: int, _headers: PackedStringArray, body: PackedByteArray) -> void:
    """处理NPC列表响应"""
    if response_code != 200:
        print("[ERROR] NPC列表请求失败: HTTP ", response_code)
        return

    var json = JSON.new()
    var parse_result = json.parse(body.get_string_from_utf8())

    if parse_result != OK:
        print("[ERROR] 解析NPC列表失败")
        return

    var response = json.data

    if response.has("npcs"):
        var npcs = response["npcs"]
        print("[INFO] 收到NPC列表: ", npcs.size(), "个NPC")
        npc_list_received.emit(npcs)
这个 API 客户端封装了三个核心功能:发送对话请求(send_chat)、获取 NPC 状态(get_npc_status)和获取 NPC 列表(get_npc_list)。所有的 HTTP 请求都是异步的,通过信号通知响应结果。我们为每个 API 创建了独立的 HTTPRequest 节点,这样可以同时发送多个请求而不会互相干扰。API 的 URL 从 Config 单例中获取,方便统一管理。对话系统监听chat_response_received信号来接收 NPC 回复,主场景监听npc_status_received信号来更新 NPC 对话气泡。
15.6.2 对话 UI 实现
对话 UI 是玩家与 NPC 交互的界面。我们需要设计一个简洁美观的对话框,包含 NPC 名称、职位、对话内容显示、输入框和按钮。
对话 UI 的结构如图 15.13 所示:
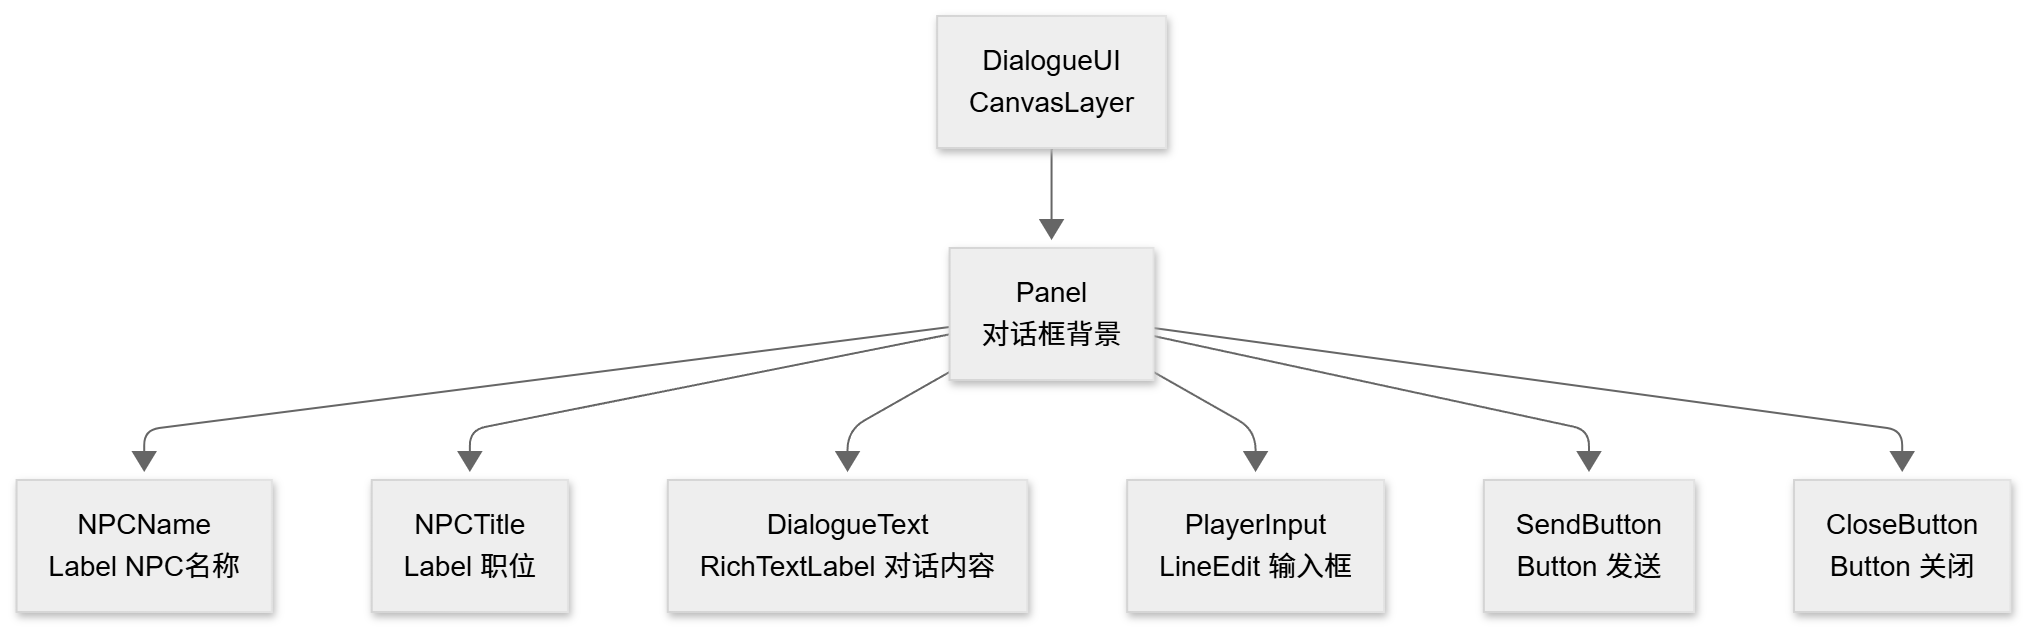
图 15.13 对话 UI 结构
对话 UI 的设计非常简洁。DialogueUI 是一个 CanvasLayer 节点,这意味着它会始终显示在游戏画面的最上层,不会被其他游戏对象遮挡。Panel 是对话框的背景,锚定在屏幕底部。Panel 下直接放置了 6 个 UI 元素:NPCName 显示 NPC 的名字,NPCTitle 显示职位,DialogueText 使用 RichTextLabel 显示对话内容(支持富文本格式),PlayerInput 是一个 LineEdit 用于玩家输入,SendButton 和 CloseButton 分别用于发送消息和关闭对话框。
对话 UI 脚本dialogue_ui.gd实现了对话界面的逻辑:
# dialogue_ui.gd
extends CanvasLayer

# UI节点引用
@onready var panel = $Panel
@onready var npc_name_label = $Panel/NPCName
@onready var npc_title_label = $Panel/NPCTitle
@onready var dialogue_text = $Panel/DialogueText
@onready var input_field = $Panel/PlayerInput
@onready var send_button = $Panel/SendButton
@onready var close_button = $Panel/CloseButton

# API客户端
var api_client: Node = null

# 当前对话的NPC
var current_npc_name: String = ""

func _ready():
    # 初始化时隐藏对话框
    visible = false

    # 连接按钮信号
    send_button.pressed.connect(_on_send_button_pressed)
    close_button.pressed.connect(_on_close_button_pressed)
    input_field.text_submitted.connect(_on_text_submitted)

    # 获取API客户端
    api_client = get_node_or_null("/root/APIClient")

func start_dialogue(npc_name: String):
    """开始与NPC对话"""
    current_npc_name = npc_name

    # 设置NPC信息
    npc_name_label.text = npc_name
    npc_title_label.text = get_npc_title(npc_name)

    # 清空对话内容
    dialogue_text.clear()
    dialogue_text.append_text("[color=gray]与 " + npc_name + " 的对话开始...[/color]\n")

    # 清空输入框
    input_field.text = ""

    # 显示对话框
    show_dialogue()

    # 聚焦输入框
    input_field.grab_focus()

func show_dialogue():
    """显示对话框"""
    visible = true

    # 通知玩家进入交互状态(禁用移动)
    var player = get_tree().get_first_node_in_group("player")
    if player and player.has_method("set_interacting"):
        player.set_interacting(true)

func hide_dialogue():
    """隐藏对话框"""
    visible = false
    current_npc_name = ""

    # 通知玩家退出交互状态(启用移动)
    var player = get_tree().get_first_node_in_group("player")
    if player and player.has_method("set_interacting"):
        player.set_interacting(false)

func _on_send_button_pressed():
    """发送按钮点击"""
    send_message()

func _on_close_button_pressed():
    """关闭按钮点击"""
    hide_dialogue()

func _on_text_submitted(_text: String):
    """输入框回车"""
    send_message()

func send_message():
    """发送消息"""
    var message = input_field.text.strip_edges()

    if message.is_empty():
        return

    if current_npc_name.is_empty():
        return

    # 显示玩家消息
    dialogue_text.append_text("\n[color=cyan]玩家:[/color] " + message + "\n")

    # 清空输入框
    input_field.text = ""

    # 禁用输入
    input_field.editable = false
    send_button.disabled = true

    # 发送API请求
    if api_client:
        api_client.send_chat_request(current_npc_name, message)

func on_chat_response_received(npc_name: String, response: String):
    """收到NPC回复"""
    if npc_name == current_npc_name:
        # 显示NPC回复
        dialogue_text.append_text("[color=yellow]" + npc_name + ":[/color] " + response + "\n")

        # 启用输入
        input_field.editable = true
        send_button.disabled = false
        input_field.grab_focus()

func get_npc_title(npc_name: String) -> String:
    """获取NPC职位"""
    var titles = {
        "张三": "Python工程师",
        "李四": "产品经理",
        "王五": "UI设计师"
    }
    return titles.get(npc_name, "")
这个对话 UI 实现了完整的对话功能。玩家可以输入消息并发送,UI 使用 RichTextLabel 的 append_text 方法显示对话内容,支持富文本格式(颜色、粗体等)。所有的 API 调用都是异步的,在等待响应时会禁用输入框,防止重复发送。对话框显示时会通知玩家进入交互状态,禁用移动,关闭时恢复移动。
15.6.3 主场景整合
最后,我们需要在主场景中整合所有的功能:玩家控制、NPC 交互、对话 UI 和 NPC 状态更新。主场景脚本main.gd负责协调这些组件,并定时从后端获取 NPC 状态,更新 NPC 的对话气泡。
# main.gd
extends Node2D

# NPC节点引用
@onready var npc_zhang: Node2D = $NPCs/NPC_Zhang
@onready var npc_li: Node2D = $NPCs/NPC_Li
@onready var npc_wang: Node2D = $NPCs/NPC_Wang

# API客户端
var api_client: Node = null

# NPC状态更新计时器
var status_update_timer: float = 0.0

func _ready():
    print("[INFO] 主场景初始化")

    # 获取API客户端
    api_client = get_node_or_null("/root/APIClient")
    if api_client:
        api_client.npc_status_received.connect(_on_npc_status_received)

        # 立即获取一次NPC状态
        api_client.get_npc_status()
    else:
        print("[ERROR] API客户端未找到")

func _process(delta: float):
    # 定时更新NPC状态
    status_update_timer += delta
    if status_update_timer >= Config.NPC_STATUS_UPDATE_INTERVAL:
        status_update_timer = 0.0
        if api_client:
            api_client.get_npc_status()

func _on_npc_status_received(dialogues: Dictionary):
    """收到NPC状态更新"""
    print("[INFO] 更新NPC状态: ", dialogues)

    # 更新各个NPC的对话
    for npc_name in dialogues:
        var dialogue = dialogues[npc_name]
        update_npc_dialogue(npc_name, dialogue)

func update_npc_dialogue(npc_name: String, dialogue: String):
    """更新指定NPC的对话"""
    var npc_node = get_npc_node(npc_name)
    if npc_node and npc_node.has_method("update_dialogue"):
        npc_node.update_dialogue(dialogue)

func get_npc_node(npc_name: String) -> Node2D:
    """根据名字获取NPC节点"""
    match npc_name:
        "张三":
            return npc_zhang
        "李四":
            return npc_li
        "王五":
            return npc_wang
        _:
            return null
主场景脚本的核心功能是定时从后端获取 NPC 状态。在_ready()中,我们获取 APIClient 单例的引用,并连接npc_status_received信号。然后立即调用get_npc_status()获取一次 NPC 状态。在_process()中,我们使用计时器每隔Config.NPC_STATUS_UPDATE_INTERVAL秒(默认 30 秒)调用一次get_npc_status()。当收到 NPC 状态更新时,_on_npc_status_received()回调函数会遍历所有 NPC,调用它们的update_dialogue()方法更新对话气泡。这样,即使玩家不与 NPC 交互,也能看到 NPC 之间的自主对话。
整个前后端通信流程如图 15.14 所示:
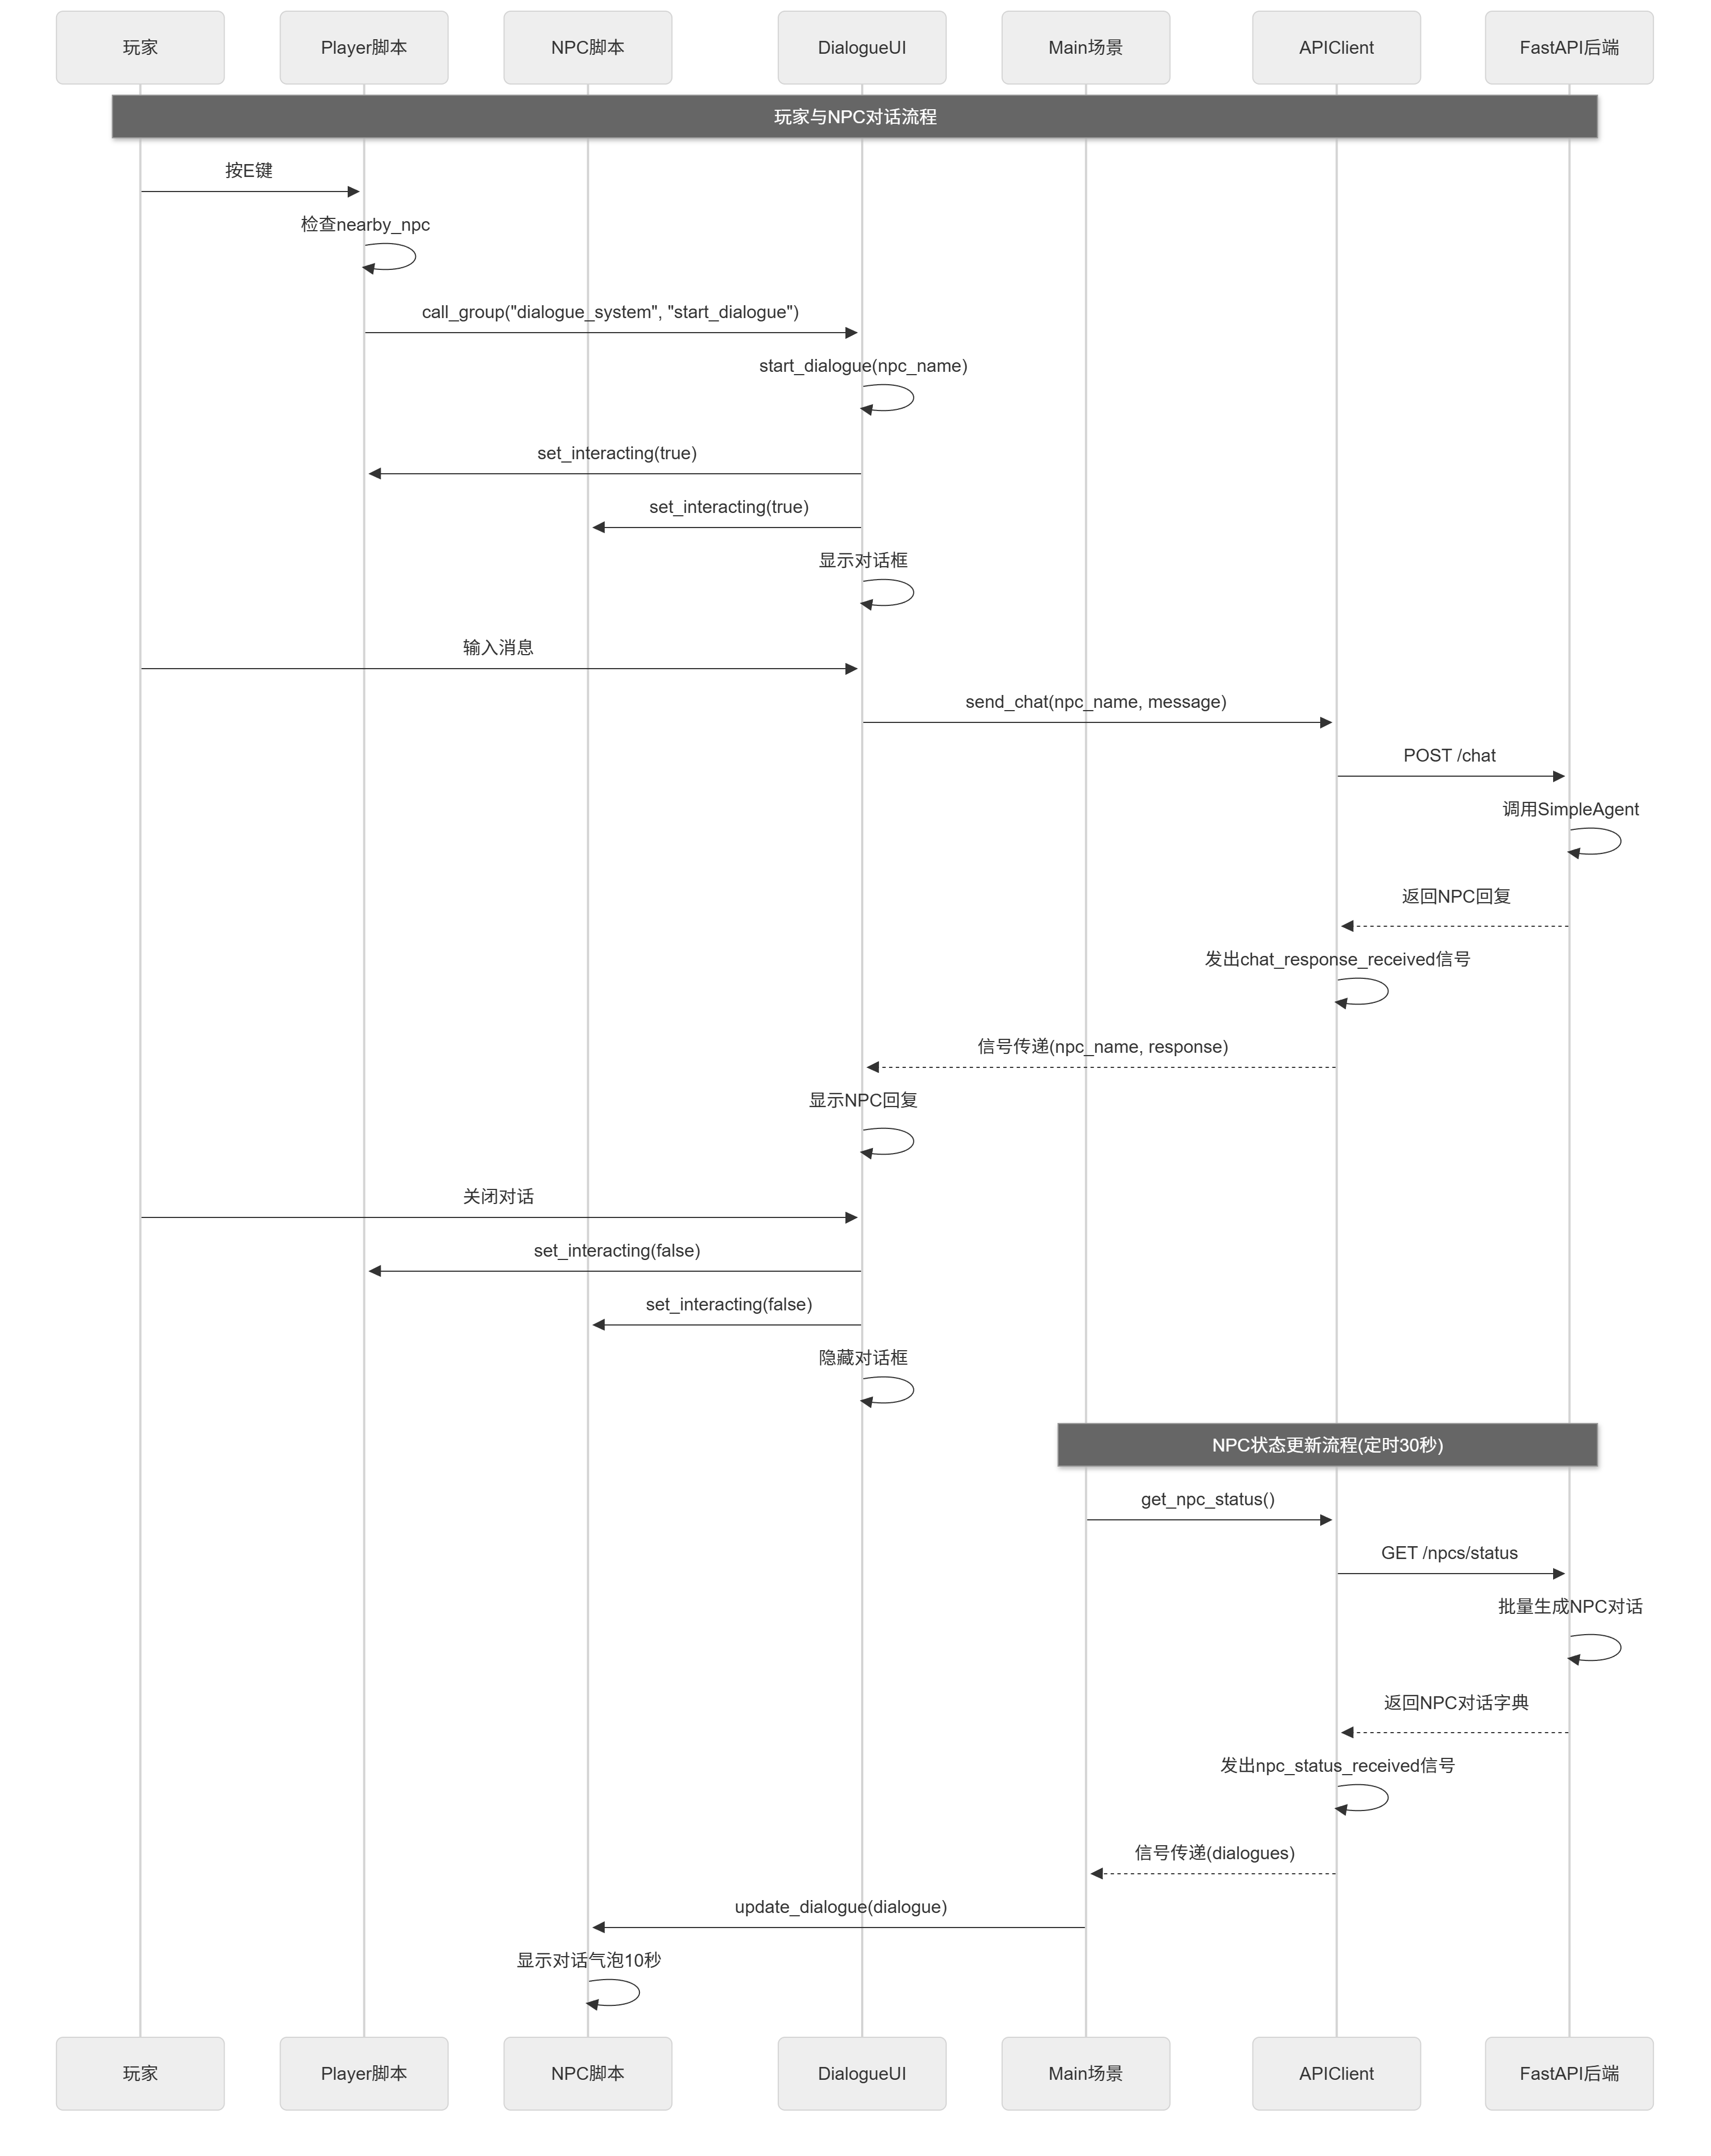
图 15.14 前后端通信完整流程
至此,前后端通信的所有功能都已实现。玩家可以在游戏中自由移动,与 NPC 互动,进行自然语言对话。同时,主场景会定时从后端获取 NPC 状态,更新 NPC 的对话气泡,展示 NPC 之间的自主对话。整个系统使用信号机制进行通信,各个组件之间松耦合,易于维护和扩展。