现在,让我们深入学习 MCP,掌握如何让智能体访问外部工具和资源。
10.2.1 MCP 协议概念介绍
(1)MCP:智能体的"USB-C"
想象一下,你的智能体可能需要同时做很多事情,例如:
- 读取本地文件系统的文档
- 查询 PostgreSQL 数据库
- 搜索 GitHub 上的代码
- 发送 Slack 消息
- 访问 Google Drive
传统方式下,你需要为每个服务编写适配器代码,处理不同的 API、认证方式、错误处理等。这不仅工作量大,而且难以维护。更重要的是,不同 LLM 平台的 function call 实现差异巨大,切换模型时需要重写大量代码。
MCP 的出现改变了这一切。它就像 USB-C 统一了各种设备的连接方式一样,MCP 统一了智能体与外部工具的交互方式。无论你使用 Claude、GPT 还是其他模型,只要它们支持 MCP 协议,就能无缝访问相同的工具和资源。
(2)MCP 架构
MCP 协议采用 Host、Client、Servers 三层架构设计,让我们通过图 10.5 的场景来理解这些组件如何协同工作。
假设你正在使用 Claude Desktop 询问:"我桌面上有哪些文档?"
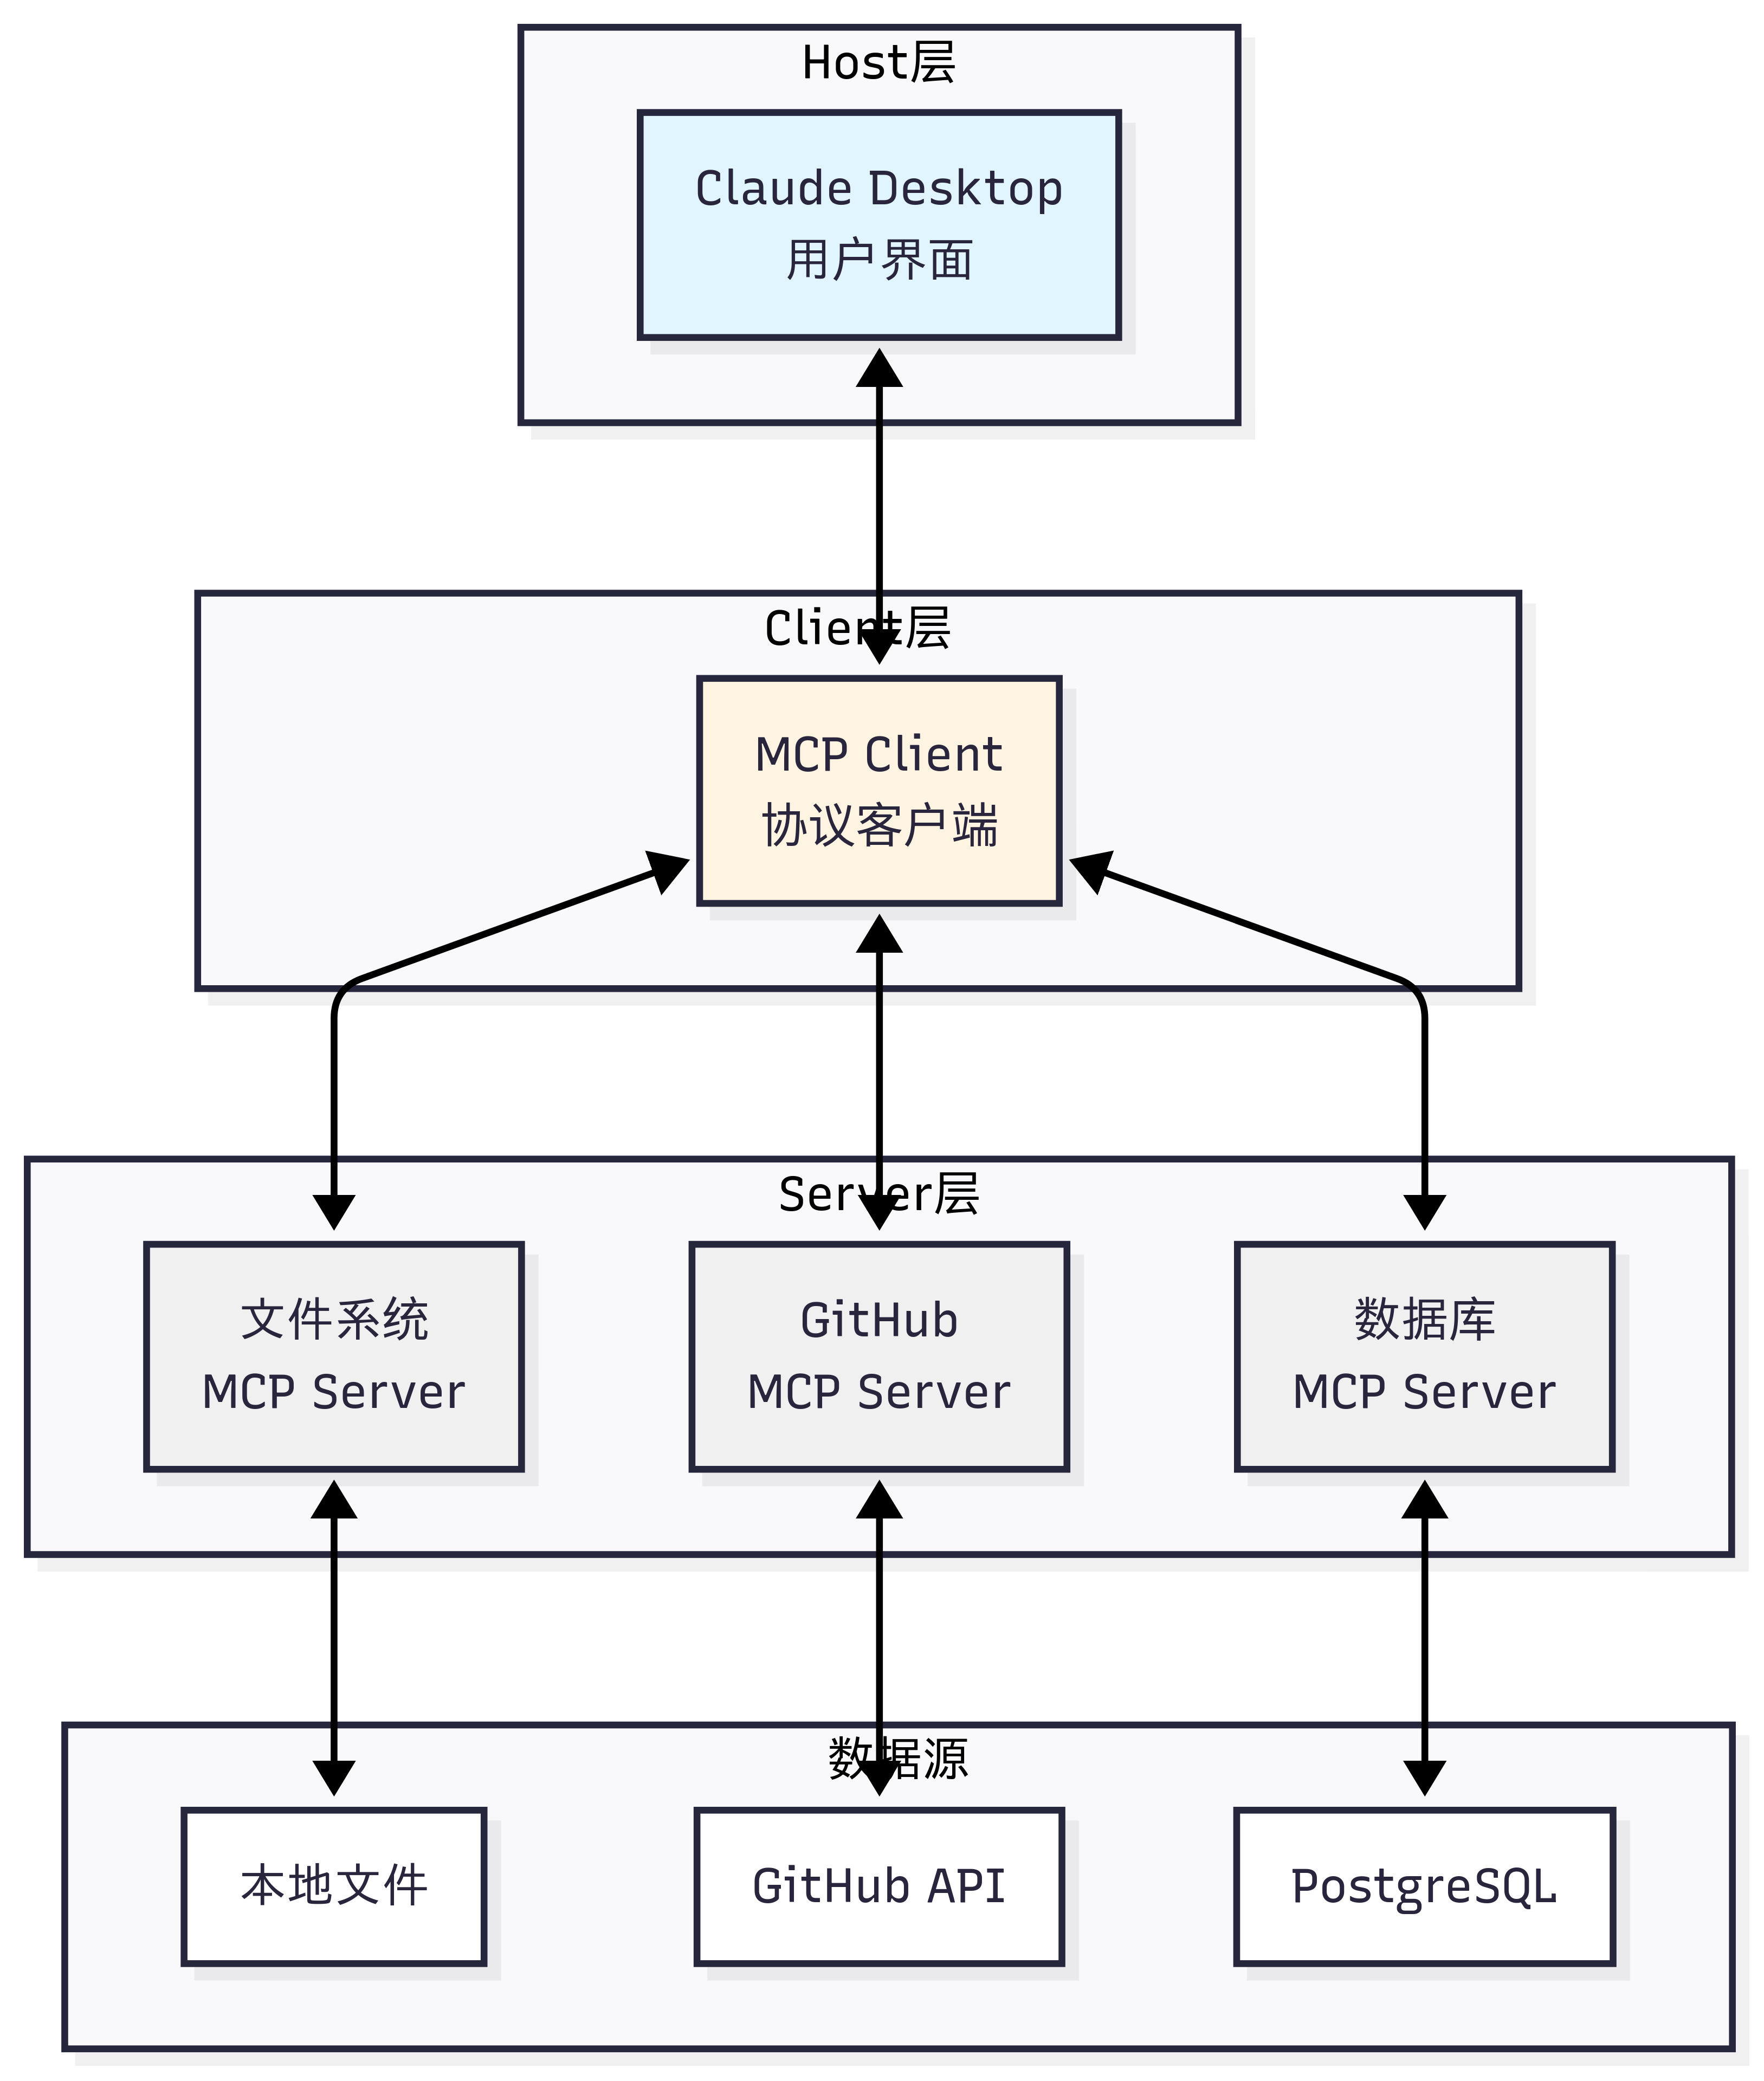
图 10.5 MCP 案例演示
三层架构的职责:
-
Host(宿主层):Claude Desktop 作为 Host,负责接收用户提问并与 Claude 模型交互。Host 是用户直接交互的界面,它管理整个对话流程。
-
Client(客户端层):当 Claude 模型决定需要访问文件系统时,Host 中内置的 MCP Client 被激活。Client 负责与适当的 MCP Server 建立连接,发送请求并接收响应。
-
Server(服务器层):文件系统 MCP Server 被调用,执行实际的文件扫描操作,访问桌面目录,并返回找到的文档列表。
完整的交互流程:用户问题 → Claude Desktop(Host) → Claude 模型分析 → 需要文件信息 → MCP Client 连接 → 文件系统 MCP Server → 执行操作 → 返回结果 → Claude 生成回答 → 显示在 Claude Desktop 上
这种架构设计的优势在于关注点分离:Host 专注于用户体验,Client 专注于协议通信,Server 专注于具体功能实现。开发者只需专注于开发对应的 MCP Server,无需关心 Host 和 Client 的实现细节。
(3)MCP 的核心能力
如表 10.2 所示,MCP 协议提供了三大核心能力,构成完整的工具访问框架:
表 10.2 MCP 核心能力

这三种能力的区别在于:Tools 是主动的(执行操作),Resources 是被动的(提供数据),Prompts 是指导性的(提供模板)。
(4)MCP 的工作流程
让我们通过一个具体例子来理解 MCP 的完整工作流程,如图 10.6 所示:
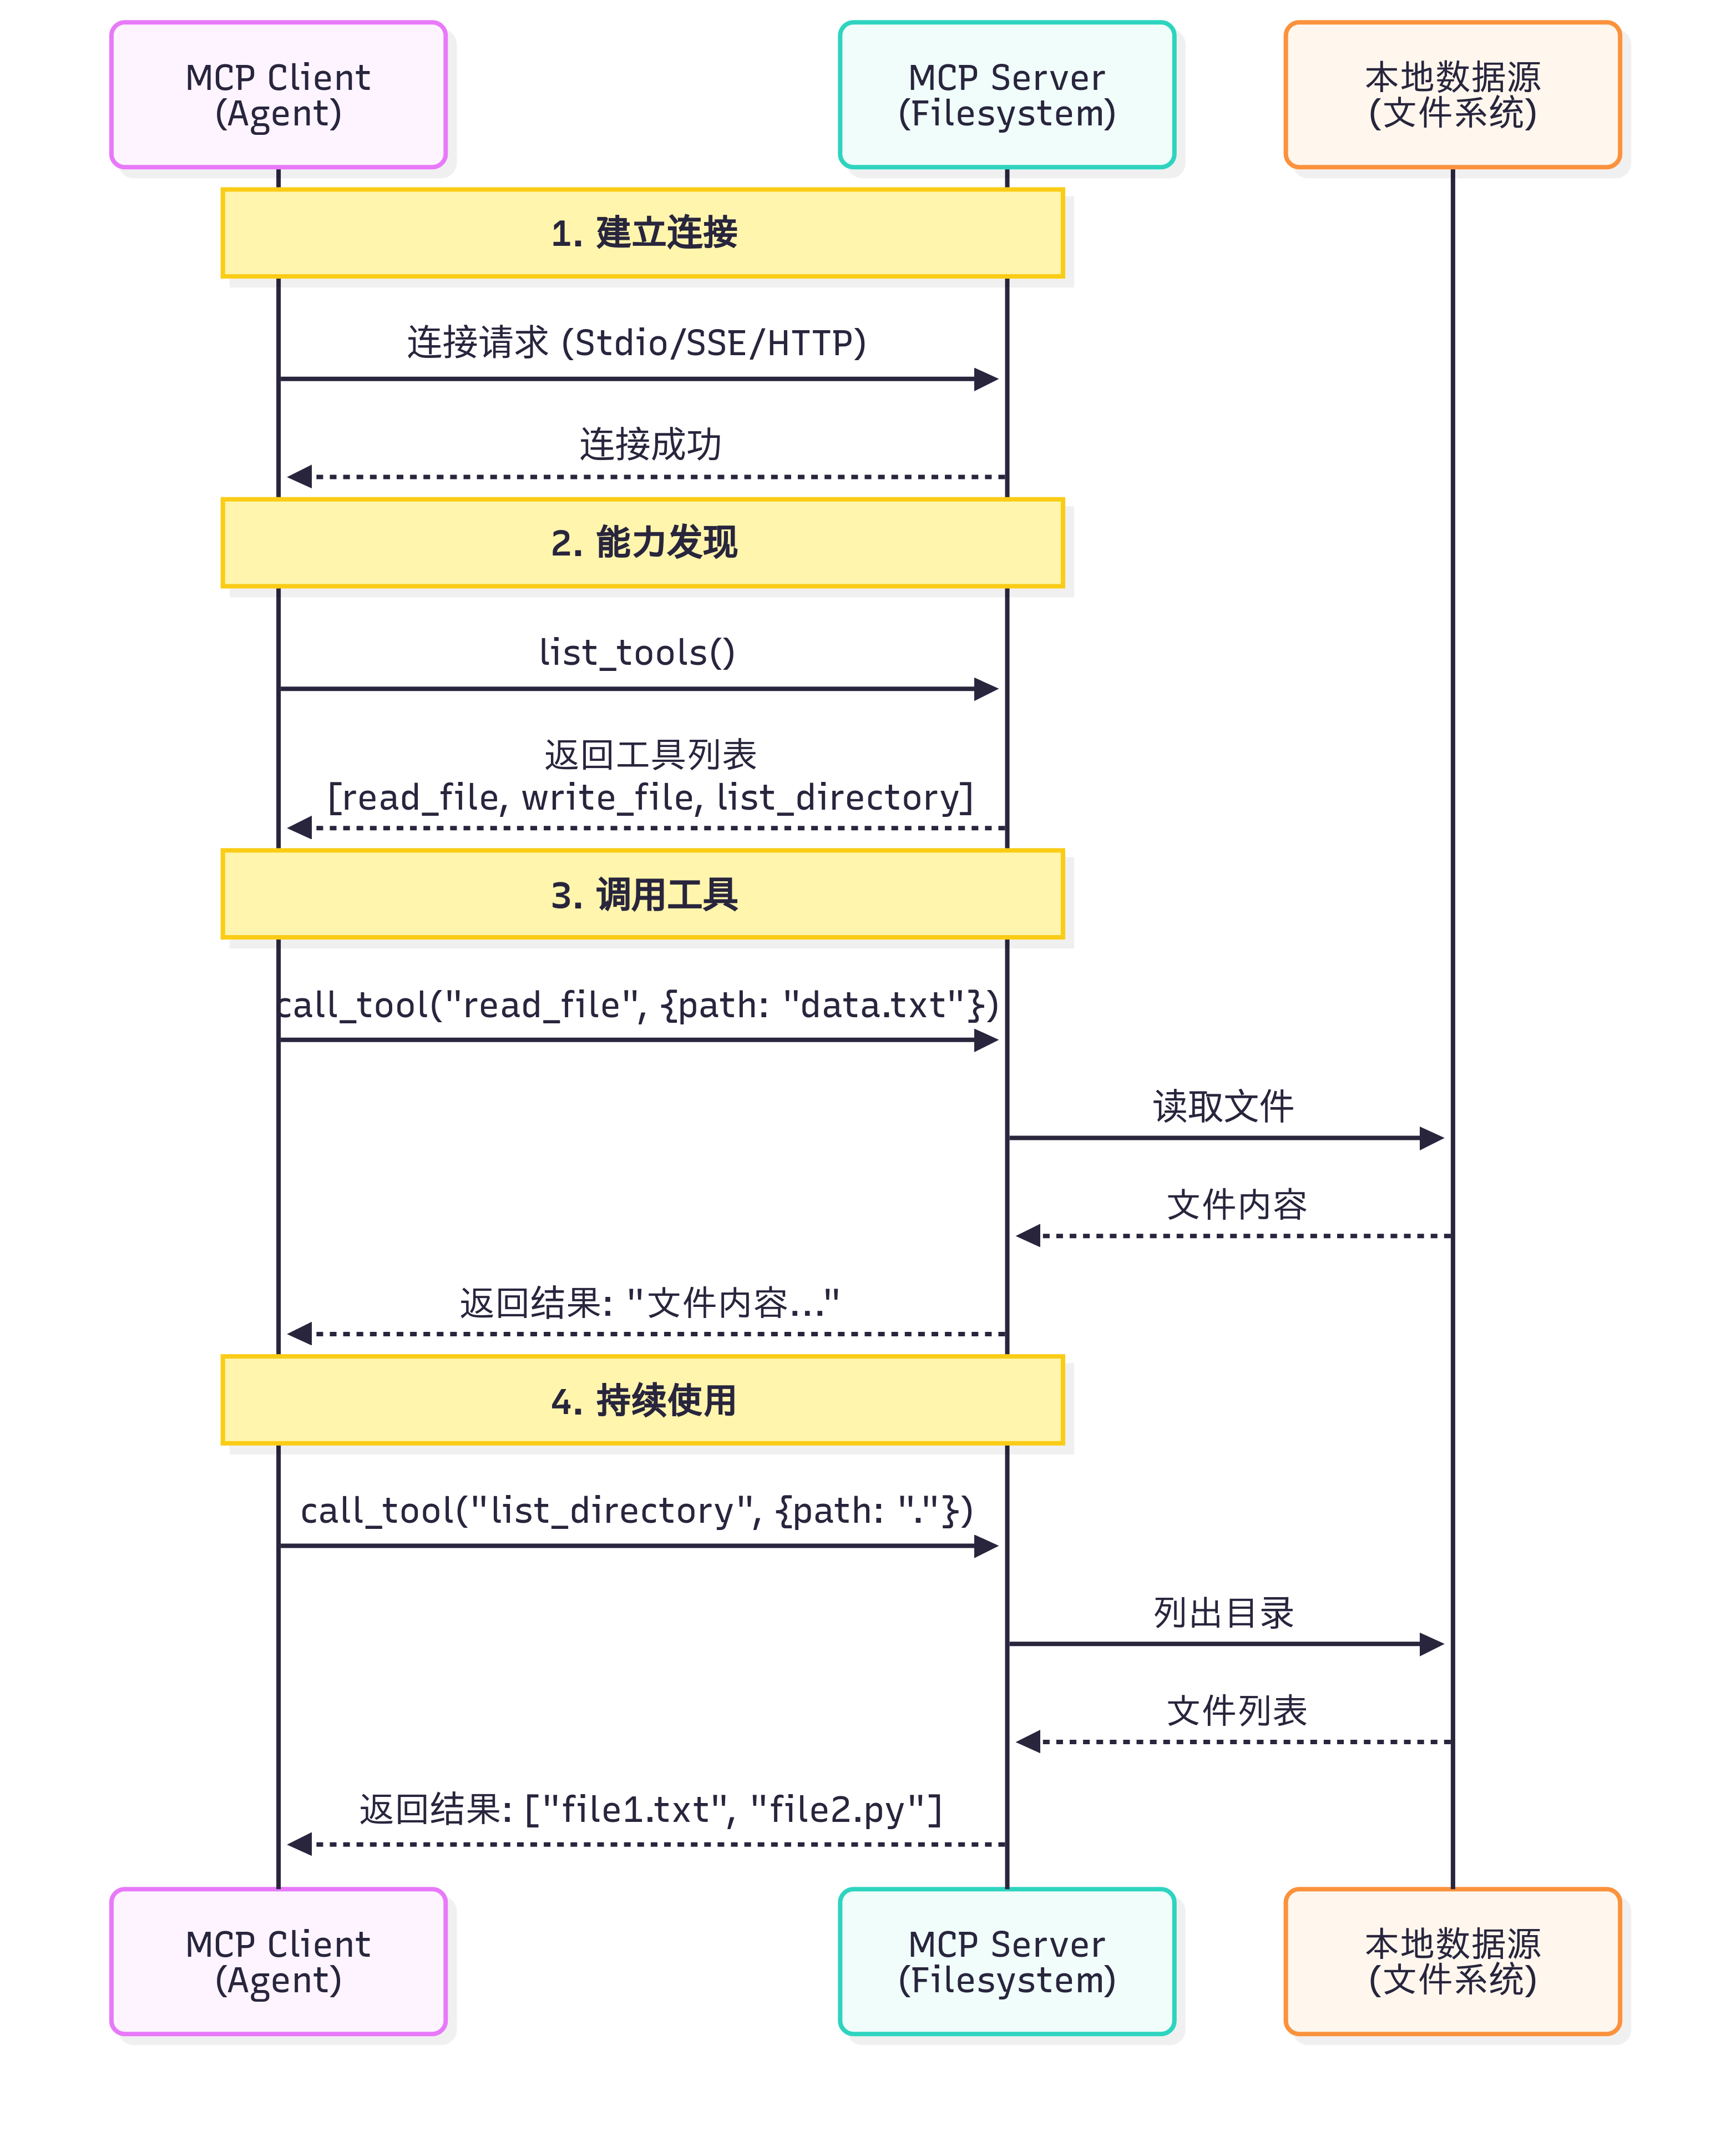
图 10.6 MCP 案例演示
一个关键问题是:Claude(或其他 LLM)是如何决定使用哪些工具的?
当用户提出问题时,完整的工具选择流程如下:
-
工具发现阶段:MCP Client 连接到 Server 后,首先调用
list_tools()获取所有可用工具的描述信息(包括工具名称、功能说明、参数定义) -
上下文构建:Client 将工具列表转换为 LLM 能理解的格式,添加到系统提示词中。例如:
你可以使用以下工具: - read_file(path: str): 读取指定路径的文件内容 - search_code(query: str, language: str): 在代码库中搜索 -
模型推理:LLM 分析用户问题和可用工具,决定是否需要调用工具以及调用哪个工具。这个决策基于工具的描述和当前对话上下文
-
工具执行:如果 LLM 决定使用工具,Client 通过 MCP Server 执行所选工具,获取结果
-
结果整合:工具执行结果被送回给 LLM,LLM 结合结果生成最终回答
这个过程是完全自动化的,LLM 会根据工具描述的质量来决定是否使用以及如何使用工具。因此,编写清晰、准确的工具描述至关重要。
(5)MCP 与 Function Calling 的差异
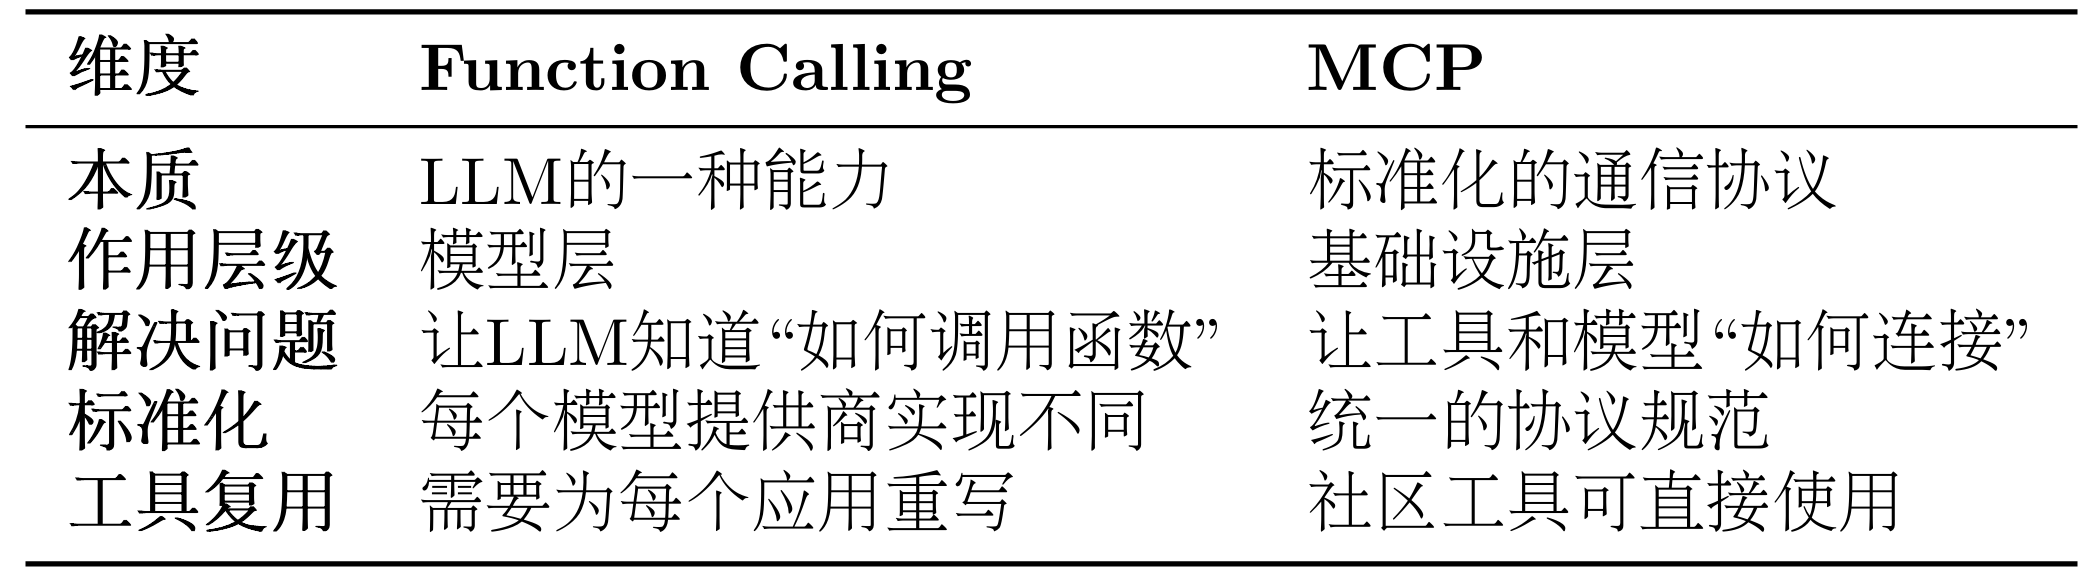
很多开发者会问:我已经在用 Function Calling 了,为什么还需要 MCP? 让我们通过表 10.3 来理解它们的区别。
表 10.3 Function Calling 与 MCP 对比
这里我们以智能体需要访问 GitHub 仓库和本地文件系统为例子来详细对比同一个任务的两种实现
方式 1:使用 Function Calling
# 步骤1:为每个LLM提供商定义函数
# OpenAI格式
openai_tools = [
    {
        "type": "function",
        "function": {
            "name": "search_github",
            "description": "搜索GitHub仓库",
            "parameters": {
                "type": "object",
                "properties": {
                    "query": {"type": "string", "description": "搜索关键词"}
                },
                "required": ["query"]
            }
        }
    }
]

# Claude格式
claude_tools = [
    {
        "name": "search_github",
        "description": "搜索GitHub仓库",
        "input_schema": {  # 注意:不是parameters
            "type": "object",
            "properties": {
                "query": {"type": "string", "description": "搜索关键词"}
            },
            "required": ["query"]
        }
    }
]

# 步骤2:自己实现工具函数
def search_github(query):
    import requests
    response = requests.get(
        "https://api.github.com/search/repositories",
        params={"q": query}
    )
    return response.json()

# 步骤3:处理不同模型的响应格式
# OpenAI的响应
if response.choices[0].message.tool_calls:
    tool_call = response.choices[0].message.tool_calls[0]
    result = search_github(**json.loads(tool_call.function.arguments))

# Claude的响应
if response.content[0].type == "tool_use":
    tool_use = response.content[0]
    result = search_github(**tool_use.input)
方式 2:使用 MCP
from hello_agents.protocols import MCPClient

# 步骤1:连接到社区提供的MCP服务器(无需自己实现)
github_client = MCPClient([
    "npx", "-y", "@modelcontextprotocol/server-github"
])

fs_client = MCPClient([
    "npx", "-y", "@modelcontextprotocol/server-filesystem", "."
])

# 步骤2:统一的调用方式(与模型无关)
async with github_client:
    # 自动发现工具
    tools = await github_client.list_tools()

    # 调用工具(标准化接口)
    result = await github_client.call_tool(
        "search_repositories",
        {"query": "AI agents"}
    )

# 步骤3:任何支持MCP的模型都能使用
# OpenAI、Claude、Llama等都使用相同的MCP客户端
首先需要明确的是,Function Calling 与 MCP 并非竞争关系,而是相辅相成的。Function Calling 是大语言模型的一项核心能力,它体现了模型内在的智能,使模型能够理解何时需要调用函数,并精准生成相应的调用参数。相对地,MCP 则扮演着基础设施协议的角色,它在工程层面解决了工具与模型如何连接的问题,通过标准化的方式来描述和调用工具。
我们可以用一个简单的类比来理解:Function Calling 相当于你学会了“如何打电话”这项技能,包括何时拨号、如何与对方沟通、何时挂断。而 MCP 则是那个全球统一的“电话通信标准”,确保了任何一部电话都能顺利地拨通另一部。
了解了它们之间的互补关系后,我们接下来看看如何在 HelloAgents 中使用 MCP 协议。
10.2.2 使用 MCP 客户端
HelloAgents 基于 FastMCP 2.0 实现了完整的 MCP 客户端功能。我们提供了异步和同步两种 API,以适应不同的使用场景。对于大多数应用,推荐使用异步 API,它能更好地处理并发请求和长时间运行的操作。下面我们将提供一个拆解的操作演示。
(1)连接到 MCP 服务器
MCP 客户端支持多种连接方式,最常用的是 Stdio 模式(通过标准输入输出与本地进程通信):
import asyncio
from hello_agents.protocols import MCPClient

async def connect_to_server():
    # 方式1:连接到社区提供的文件系统服务器
    # npx会自动下载并运行@modelcontextprotocol/server-filesystem包
    client = MCPClient([
        "npx", "-y",
        "@modelcontextprotocol/server-filesystem",
        "."  # 指定根目录
    ])

    # 使用async with确保连接正确关闭
    async with client:
        # 在这里使用client
        tools = await client.list_tools()
        print(f"可用工具: {[t['name'] for t in tools]}")

    # 方式2:连接到自定义的Python MCP服务器
    client = MCPClient(["python", "my_mcp_server.py"])
    async with client:
        # 使用client...
        pass

# 运行异步函数
asyncio.run(connect_to_server())
(2)发现可用工具
连接成功后,第一步通常是查询服务器提供了哪些工具:
async def discover_tools():
    client = MCPClient(["npx", "-y", "@modelcontextprotocol/server-filesystem", "."])

    async with client:
        # 获取所有可用工具
        tools = await client.list_tools()

        print(f"服务器提供了 {len(tools)} 个工具:")
        for tool in tools:
            print(f"\n工具名称: {tool['name']}")
            print(f"描述: {tool.get('description', '无描述')}")

            # 打印参数信息
            if 'inputSchema' in tool:
                schema = tool['inputSchema']
                if 'properties' in schema:
                    print("参数:")
                    for param_name, param_info in schema['properties'].items():
                        param_type = param_info.get('type', 'any')
                        param_desc = param_info.get('description', '')
                        print(f"  - {param_name} ({param_type}): {param_desc}")

asyncio.run(discover_tools())

# 输出示例:
# 服务器提供了 5 个工具:
#
# 工具名称: read_file
# 描述: 读取文件内容
# 参数:
#   - path (string): 文件路径
#
# 工具名称: write_file
# 描述: 写入文件内容
# 参数:
#   - path (string): 文件路径
#   - content (string): 文件内容
(3)调用工具
调用工具时,只需提供工具名称和符合 JSON Schema 的参数:
async def use_tools():
    client = MCPClient(["npx", "-y", "@modelcontextprotocol/server-filesystem", "."])

    async with client:
        # 读取文件
        result = await client.call_tool("read_file", {"path": "my_README.md"})
        print(f"文件内容:\n{result}")

        # 列出目录
        result = await client.call_tool("list_directory", {"path": "."})
        print(f"当前目录文件:{result}")

        # 写入文件
        result = await client.call_tool("write_file", {
            "path": "output.txt",
            "content": "Hello from MCP!"
        })
        print(f"写入结果:{result}")

asyncio.run(use_tools())
在这里提供一种更为安全的方式来调用 MCP 服务,可供参考:
async def safe_tool_call():
    client = MCPClient(["npx", "-y", "@modelcontextprotocol/server-filesystem", "."])

    async with client:
        try:
            # 尝试读取可能不存在的文件
            result = await client.call_tool("read_file", {"path": "nonexistent.txt"})
            print(result)
        except Exception as e:
            print(f"工具调用失败: {e}")
            # 可以选择重试、使用默认值或向用户报告错误

asyncio.run(safe_tool_call())
(4)访问资源
除了工具,MCP 服务器还可以提供资源(Resources):
# 列出可用资源
resources = client.list_resources()
print(f"可用资源:{[r['uri'] for r in resources]}")

# 读取资源
resource_content = client.read_resource("file:///path/to/resource")
print(f"资源内容:{resource_content}")
(5)使用提示模板
MCP 服务器可以提供预定义的提示模板(Prompts):
# 列出可用提示
prompts = client.list_prompts()
print(f"可用提示:{[p['name'] for p in prompts]}")

# 获取提示内容
prompt = client.get_prompt("code_review", {"language": "python"})
print(f"提示内容:{prompt}")
(6)完整示例:使用 GitHub MCP 服务
让我们通过一个完整的例子来看如何使用社区提供的 GitHub MCP 服务,我们将采用封装好的 MCP Tools 来:
"""
GitHub MCP 服务示例

注意:需要设置环境变量
    Windows: $env:GITHUB_PERSONAL_ACCESS_TOKEN="your_token_here"
    Linux/macOS: export GITHUB_PERSONAL_ACCESS_TOKEN="your_token_here"
"""

from hello_agents.tools import MCPTool

# 创建 GitHub MCP 工具
github_tool = MCPTool(
    server_command=["npx", "-y", "@modelcontextprotocol/server-github"]
)

# 1. 列出可用工具
print("📋 可用工具:")
result = github_tool.run({"action": "list_tools"})
print(result)

# 2. 搜索仓库
print("\n🔍 搜索仓库:")
result = github_tool.run({
    "action": "call_tool",
    "tool_name": "search_repositories",
    "arguments": {
        "query": "AI agents language:python",
        "page": 1,
        "perPage": 3
    }
})
print(result)
10.2.3 MCP 传输方式详解
MCP 协议的一个重要特性是传输层无关性(Transport Agnostic)。这意味着 MCP 协议本身不依赖于特定的传输方式,可以在不同的通信通道上运行。HelloAgents 基于 FastMCP 2.0,提供了完整的传输方式支持,让你可以根据实际场景选择最合适的传输模式。
(1)传输方式概览
HelloAgents 的MCPClient支持五种传输方式,每种都有不同的使用场景,如表 10.4 所示:
表 10.4 MCP 传输方式对比

(2)传输方式使用示例
from hello_agents.tools import MCPTool

# 1. Memory Transport - 内存传输(用于测试)
# 不指定任何参数,使用内置演示服务器
mcp_tool = MCPTool()

# 2. Stdio Transport - 标准输入输出传输(本地开发)
# 使用命令列表启动本地服务器
mcp_tool = MCPTool(server_command=["python", "examples/mcp_example_server.py"])

# 3. Stdio Transport with Args - 带参数的命令传输
# 可以传递额外参数
mcp_tool = MCPTool(server_command=["python", "examples/mcp_example_server.py", "--debug"])

# 4. Stdio Transport - 社区服务器(npx方式)
# 使用npx启动社区MCP服务器
mcp_tool = MCPTool(server_command=["npx", "-y", "@modelcontextprotocol/server-filesystem", "."])

# 5. HTTP/SSE/StreamableHTTP Transport
# 注意:MCPTool主要用于Stdio和Memory传输
# 对于HTTP/SSE等远程传输,建议直接使用MCPClient
(3)Memory Transport - 内存传输
适用场景:单元测试、快速原型开发
from hello_agents.tools import MCPTool

# 使用内置演示服务器(Memory传输)
mcp_tool = MCPTool()

# 列出可用工具
result = mcp_tool.run({"action": "list_tools"})
print(result)

# 调用工具
result = mcp_tool.run({
    "action": "call_tool",
    "tool_name": "add",
    "arguments": {"a": 10, "b": 20}
})
print(result)
(4)Stdio Transport - 标准输入输出传输
适用场景:本地开发、调试、Python 脚本服务器
from hello_agents.tools import MCPTool

# 方式1:使用自定义Python服务器
mcp_tool = MCPTool(server_command=["python", "my_mcp_server.py"])

# 方式2:使用社区服务器(文件系统)
mcp_tool = MCPTool(server_command=["npx", "-y", "@modelcontextprotocol/server-filesystem", "."])

# 列出工具
result = mcp_tool.run({"action": "list_tools"})
print(result)

# 调用工具
result = mcp_tool.run({
    "action": "call_tool",
    "tool_name": "read_file",
    "arguments": {"path": "README.md"}
})
print(result)
(5)HTTP Transport - HTTP 传输
适用场景:生产环境、远程服务、微服务架构
# 注意:MCPTool 主要用于 Stdio 和 Memory 传输
# 对于 HTTP/SSE 等远程传输,建议使用底层的 MCPClient

import asyncio
from hello_agents.protocols import MCPClient

async def test_http_transport():
    # 连接到远程 HTTP MCP 服务器
    client = MCPClient("http://api.example.com/mcp")

    async with client:
        # 获取服务器信息
        tools = await client.list_tools()
        print(f"远程服务器工具: {len(tools)} 个")

        # 调用远程工具
        result = await client.call_tool("process_data", {
            "data": "Hello, World!",
            "operation": "uppercase"
        })
        print(f"远程处理结果: {result}")

# 注意:需要实际的 HTTP MCP 服务器
# asyncio.run(test_http_transport())
(6)SSE Transport - Server-Sent Events 传输
适用场景:实时通信、流式处理、长连接
# 注意:MCPTool 主要用于 Stdio 和 Memory 传输
# 对于 SSE 传输,建议使用底层的 MCPClient

import asyncio
from hello_agents.protocols import MCPClient

async def test_sse_transport():
    # 连接到 SSE MCP 服务器
    client = MCPClient(
        "http://localhost:8080/sse",
        transport_type="sse"
    )

    async with client:
        # SSE 特别适合流式处理
        result = await client.call_tool("stream_process", {
            "input": "大量数据处理请求",
            "stream": True
        })
        print(f"流式处理结果: {result}")

# 注意:需要支持 SSE 的 MCP 服务器
# asyncio.run(test_sse_transport())
(7)StreamableHTTP Transport - 流式 HTTP 传输
适用场景:需要双向流式通信的 HTTP 场景
# 注意:MCPTool 主要用于 Stdio 和 Memory 传输
# 对于 StreamableHTTP 传输,建议使用底层的 MCPClient

import asyncio
from hello_agents.protocols import MCPClient

async def test_streamable_http_transport():
    # 连接到 StreamableHTTP MCP 服务器
    client = MCPClient(
        "http://localhost:8080/mcp",
        transport_type="streamable_http"
    )

    async with client:
        # 支持双向流式通信
        tools = await client.list_tools()
        print(f"StreamableHTTP 服务器工具: {len(tools)} 个")

# 注意:需要支持 StreamableHTTP 的 MCP 服务器
# asyncio.run(test_streamable_http_transport())
10.2.4 在智能体中使用 MCP 工具
前面我们学习了如何直接使用 MCP 客户端。但在实际应用中,我们更希望让智能体自动调用 MCP 工具,而不是手动编写调用代码。HelloAgents 提供了MCPTool包装器,让 MCP 服务器无缝集成到智能体的工具链中。
(1)MCP 工具的自动展开机制
HelloAgents 的MCPTool有一个特性:自动展开。当你添加一个 MCP 工具到 Agent 时,它会自动将 MCP 服务器提供的所有工具展开为独立的工具,让 Agent 可以像调用普通工具一样调用它们。
方式 1:使用内置演示服务器
我们在之前实现过计算器的工具函数,在这里将他转化为 MCP 的服务。这是最简单的使用方式。
from hello_agents import SimpleAgent, HelloAgentsLLM
from hello_agents.tools import MCPTool

agent = SimpleAgent(name="助手", llm=HelloAgentsLLM())

# 无需任何配置,自动使用内置演示服务器
mcp_tool = MCPTool(name="calculator")
agent.add_tool(mcp_tool)
# ✅ MCP工具 'calculator' 已展开为 6 个独立工具

# 智能体可以直接使用展开后的工具
response = agent.run("计算 25 乘以 16")
print(response)  # 输出:25 乘以 16 的结果是 400
自动展开后的工具:
calculator_add- 加法计算器calculator_subtract- 减法计算器calculator_multiply- 乘法计算器calculator_divide- 除法计算器calculator_greet- 友好问候calculator_get_system_info- 获取系统信息
Agent 调用时只需提供参数,例如:[TOOL_CALL:calculator_multiply:a=25,b=16],系统会自动处理类型转换和 MCP 调用。
方式 2:连接外部 MCP 服务器
在实际项目中,你需要连接到功能更强大的 MCP 服务器。这些服务器可以是:
- 社区提供的官方服务器(如文件系统、GitHub、数据库等)
- 你自己编写的自定义服务器(封装业务逻辑)
from hello_agents import SimpleAgent, HelloAgentsLLM
from hello_agents.tools import MCPTool

agent = SimpleAgent(name="文件助手", llm=HelloAgentsLLM())

# 示例1:连接到社区提供的文件系统服务器
fs_tool = MCPTool(
    name="filesystem",  # 指定唯一名称
    description="访问本地文件系统",
    server_command=["npx", "-y", "@modelcontextprotocol/server-filesystem", "."]
)
agent.add_tool(fs_tool)

# 示例2:连接到自定义的 Python MCP 服务器
# 关于如何编写自定义MCP服务器,请参考10.5章节
custom_tool = MCPTool(
    name="custom_server",  # 使用不同的名称
    description="自定义业务逻辑服务器",
    server_command=["python", "my_mcp_server.py"]
)
agent.add_tool(custom_tool)

# Agent现在可以自动使用这些工具!
response = agent.run("请读取my_README.md文件,并总结其中的主要内容")
print(response)
当使用多个 MCP 服务器时,务必为每个 MCPTool 指定不同的 name,这个 name 会作为前缀添加到展开的工具名前,避免冲突。例如:name="fs" 会展开为 fs_read_file、fs_write_file 等。如果你需要编写自己的 MCP 服务器来封装特定的业务逻辑,请参考 10.5 节内容。
(2)MCP 工具自动展开的工作原理
理解自动展开机制有助于你更好地使用 MCP 工具。让我们深入了解它是如何工作的:
# 用户代码
fs_tool = MCPTool(name="fs", server_command=[...])
agent.add_tool(fs_tool)

# 内部发生的事情:
# 1. MCPTool连接到服务器,发现14个工具
# 2. 为每个工具创建包装器:
#    - fs_read_text_file (参数: path, tail, head)
#    - fs_write_file (参数: path, content)
#    - ...
# 3. 注册到Agent的工具注册表

# Agent调用
response = agent.run("读取README.md")

# Agent内部:
# 1. 识别需要调用 fs_read_text_file
# 2. 生成参数:path=README.md
# 3. 包装器转换为MCP格式:
#    {"action": "call_tool", "tool_name": "read_text_file", "arguments": {"path": "README.md"}}
# 4. 调用MCP服务器
# 5. 返回文件内容
系统会根据工具的参数定义自动转换类型:
# Agent调用计算器
agent.run("计算 25 乘以 16")

# Agent生成:a=25,b=16 (字符串)
# 系统自动转换为:{"a": 25.0, "b": 16.0} (数字)
# MCP服务器接收到正确的数字类型
(3)实战案例:智能文档助手
让我们构建一个完整的智能文档助手,这里我们用一个简单的多智能体编排进行演示:
"""
多Agent协作的智能文档助手

使用两个SimpleAgent分工协作:
- Agent1:GitHub搜索专家
- Agent2:文档生成专家
"""
from hello_agents import SimpleAgent, HelloAgentsLLM
from hello_agents.tools import MCPTool
from dotenv import load_dotenv

# 加载.env文件中的环境变量
load_dotenv(dotenv_path="../HelloAgents/.env")

print("="*70)
print("多Agent协作的智能文档助手")
print("="*70)

# ============================================================
# Agent 1: GitHub搜索专家
# ============================================================
print("\n【步骤1】创建GitHub搜索专家...")

github_searcher = SimpleAgent(
    name="GitHub搜索专家",
    llm=HelloAgentsLLM(),
    system_prompt="""你是一个GitHub搜索专家。
你的任务是搜索GitHub仓库并返回结果。
请返回清晰、结构化的搜索结果,包括:
- 仓库名称
- 简短描述

保持简洁,不要添加额外的解释。"""
)

# 添加GitHub工具
github_tool = MCPTool(
    name="gh",
    server_command=["npx", "-y", "@modelcontextprotocol/server-github"]
)
github_searcher.add_tool(github_tool)

# ============================================================
# Agent 2: 文档生成专家
# ============================================================
print("\n【步骤2】创建文档生成专家...")

document_writer = SimpleAgent(
    name="文档生成专家",
    llm=HelloAgentsLLM(),
    system_prompt="""你是一个文档生成专家。
你的任务是根据提供的信息生成结构化的Markdown报告。

报告应该包括:
- 标题
- 简介
- 主要内容(分点列出,包括项目名称、描述等)
- 总结

请直接输出完整的Markdown格式报告内容,不要使用工具保存。"""
)

# 添加文件系统工具
fs_tool = MCPTool(
    name="fs",
    server_command=["npx", "-y", "@modelcontextprotocol/server-filesystem", "."]
)
document_writer.add_tool(fs_tool)

# ============================================================
# 执行任务
# ============================================================
print("\n" + "="*70)
print("开始执行任务...")
print("="*70)

try:
    # 步骤1:GitHub搜索
    print("\n【步骤3】Agent1 搜索GitHub...")
    search_task = "搜索关于'AI agent'的GitHub仓库,返回前5个最相关的结果"

    search_results = github_searcher.run(search_task)

    print("\n搜索结果:")
    print("-" * 70)
    print(search_results)
    print("-" * 70)

    # 步骤2:生成报告
    print("\n【步骤4】Agent2 生成报告...")
    report_task = f"""
根据以下GitHub搜索结果,生成一份Markdown格式的研究报告:

{search_results}

报告要求:
1. 标题:# AI Agent框架研究报告
2. 简介:说明这是关于AI Agent的GitHub项目调研
3. 主要发现:列出找到的项目及其特点(包括名称、描述等)
4. 总结:总结这些项目的共同特点

请直接输出完整的Markdown格式报告。
"""

    report_content = document_writer.run(report_task)

    print("\n报告内容:")
    print("=" * 70)
    print(report_content)
    print("=" * 70)

    # 步骤3:保存报告
    print("\n【步骤5】保存报告到文件...")
    import os
    try:
        with open("report.md", "w", encoding="utf-8") as f:
            f.write(report_content)
        print("✅ 报告已保存到 report.md")

        # 验证文件
        file_size = os.path.getsize("report.md")
        print(f"✅ 文件大小: {file_size} 字节")
    except Exception as e:
        print(f"❌ 保存失败: {e}")

    print("\n" + "="*70)
    print("任务完成!")
    print("="*70)

except Exception as e:
    print(f"\n❌ 错误: {e}")
    import traceback
    traceback.print_exc()
github_searcher会在这个过程中调用gh_search_repositories搜索 GitHub 项目。得到的结果会返回给document_writer当做输入,进一步指导报告的生成,最后保存报告到 report.md。
10.2.5 MCP 社区生态
MCP 协议的一个巨大优势是丰富的社区生态。Anthropic 和社区开发者已经创建了大量现成的 MCP 服务器,涵盖文件系统、数据库、API 服务等各种场景。这意味着你不需要从零开始编写工具适配器,可以直接使用这些经过验证的服务器。
这里给出 MCP 社区的三个资源库:
-
Awesome MCP Servers (https://github.com/punkpeye/awesome-mcp-servers)
- 社区维护的 MCP 服务器精选列表
- 包含各种第三方服务器
- 按功能分类,易于查找
-
MCP Servers Website (https://mcpservers.org/)
- 官方 MCP 服务器目录网站
- 提供搜索和筛选功能
- 包含使用说明和示例
-
Official MCP Servers (https://github.com/modelcontextprotocol/servers)
- Anthropic 官方维护的服务器
- 质量最高、文档最完善
- 包含常用服务的实现
表 10.5 和 10.6 给出常用的官方 MCP 服务器和社区热门 MCP 服务器:
表 10.5 常用官方 MCP 服务器
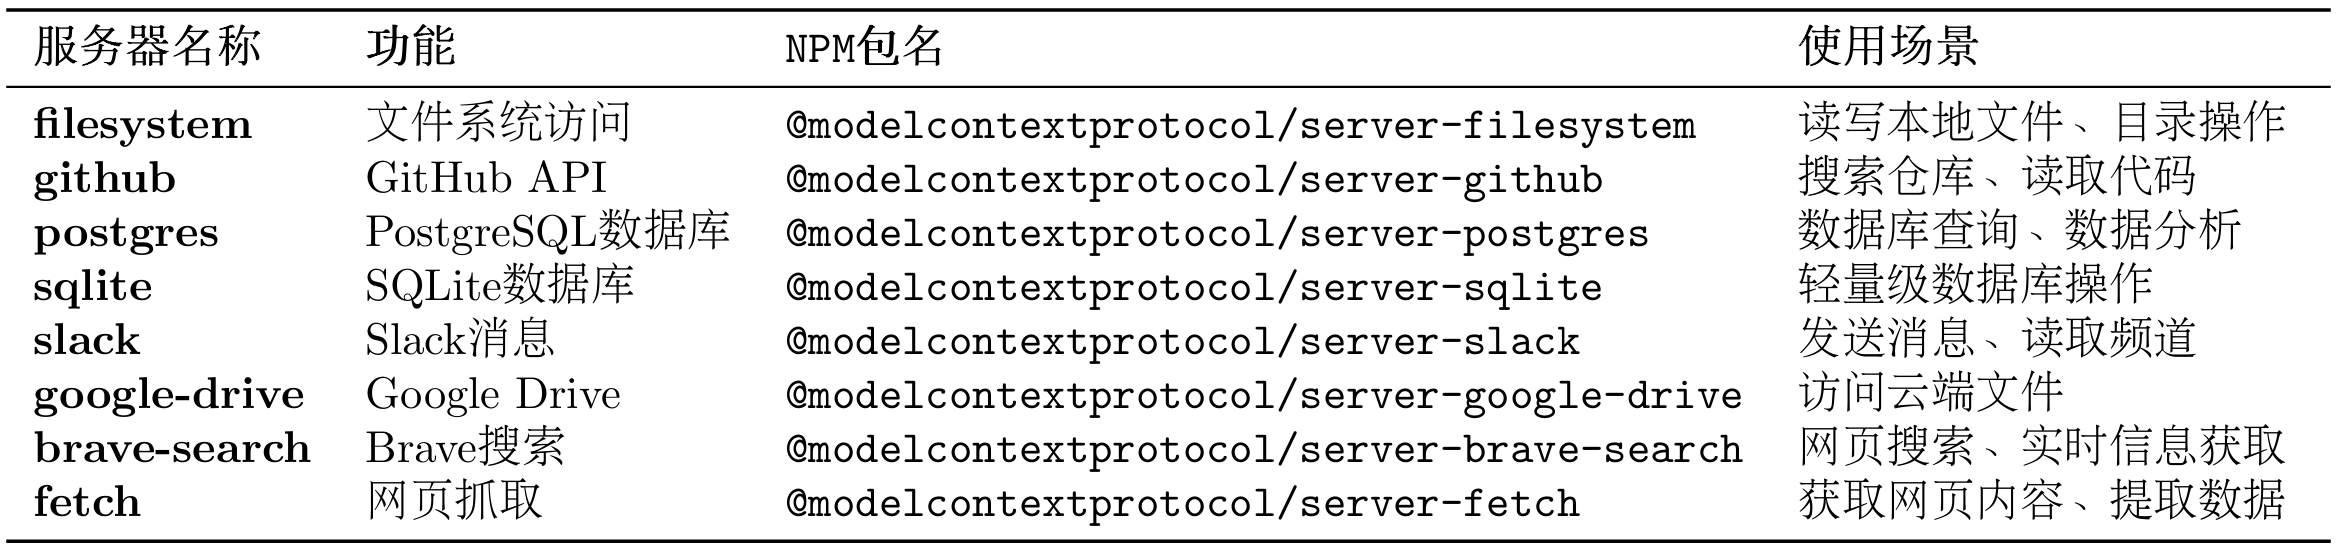
表 10.6 社区热门 MCP 服务器
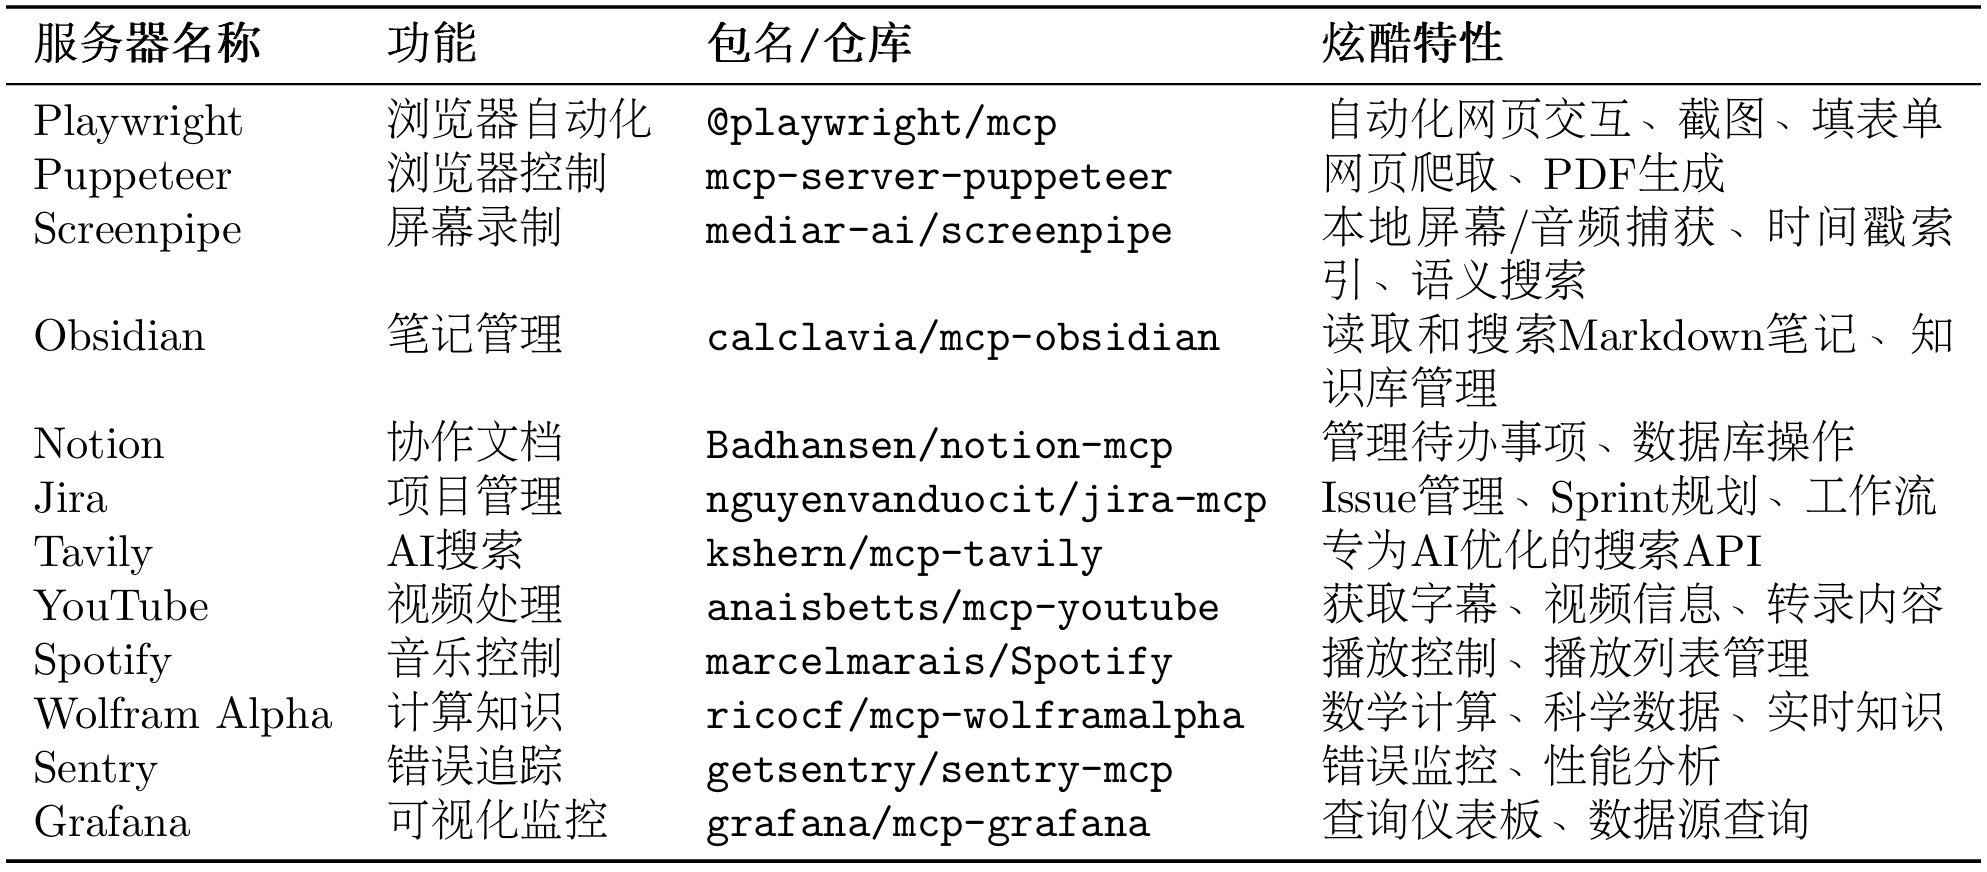
以下是一些特别有趣的案例 TODO 可供参考:
-
自动化网页测试(Playwright)
# Agent可以自动: # - 打开浏览器访问网站 # - 填写表单并提交 # - 截图验证结果 # - 生成测试报告 playwright_tool = MCPTool( name="playwright", server_command=["npx", "-y", "@playwright/mcp"] ) -
智能笔记助手(Obsidian + Perplexity)
# Agent可以: # - 搜索最新技术资讯(Perplexity) # - 整理成结构化笔记 # - 保存到Obsidian知识库 # - 自动建立笔记间的链接 -
项目管理自动化(Jira + GitHub)
# Agent可以: # - 从GitHub Issue创建Jira任务 # - 同步代码提交到Jira # - 自动更新Sprint进度 # - 生成项目报告 -
内容创作工作流(YouTube + Notion + Spotify)
# Agent可以:
# - 获取YouTube视频字幕
# - 生成内容摘要
# - 保存到Notion数据库
# - 播放背景音乐(Spotify)
通过这一节内容的讲解,希望你能探索更多 MCP 的实现案例,也欢迎投稿至 Helloagents!接下来,让我们学习 A2A 协议。