13.5.1 前后端分离的 Web 架构
在开始前端开发之前,我们需要理解现代 Web 应用的架构模式。在早期的 Web 开发中,前端和后端是混在一起的,比如 PHP、JSP 这样的技术,HTML 模板和业务逻辑代码写在同一个文件里。这种方式在小项目中很方便,但在大型项目中会遇到很多问题:前端和后端开发者需要频繁协调,代码难以复用,测试困难。
现代 Web 应用普遍采用前后端分离的架构。后端只负责提供 API 接口,返回 JSON 格式的数据。前端是一个独立的应用,通过 HTTP 请求调用后端 API,获取数据后渲染页面。这种架构有几个明显的优势:前端和后端可以独立开发、独立部署、独立测试;前端可以是 Web 应用、移动应用或桌面应用,都使用同一套后端 API;前端可以使用现代的框架和工具链,提供更好的用户体验。
在我们的智能旅行助手项目中,后端是用 Python 和 FastAPI 实现的,提供了一个核心 API 接口POST /api/trip/plan,接收旅行需求,返回旅行计划。前端是用 Vue 3 和 TypeScript 实现的,是一个单页应用(SPA),用户在浏览器中填写表单,点击"开始规划"按钮,前端发送 HTTP 请求到后端,等待响应,然后渲染结果页面。整个过程中,页面不会刷新,用户体验很流畅。
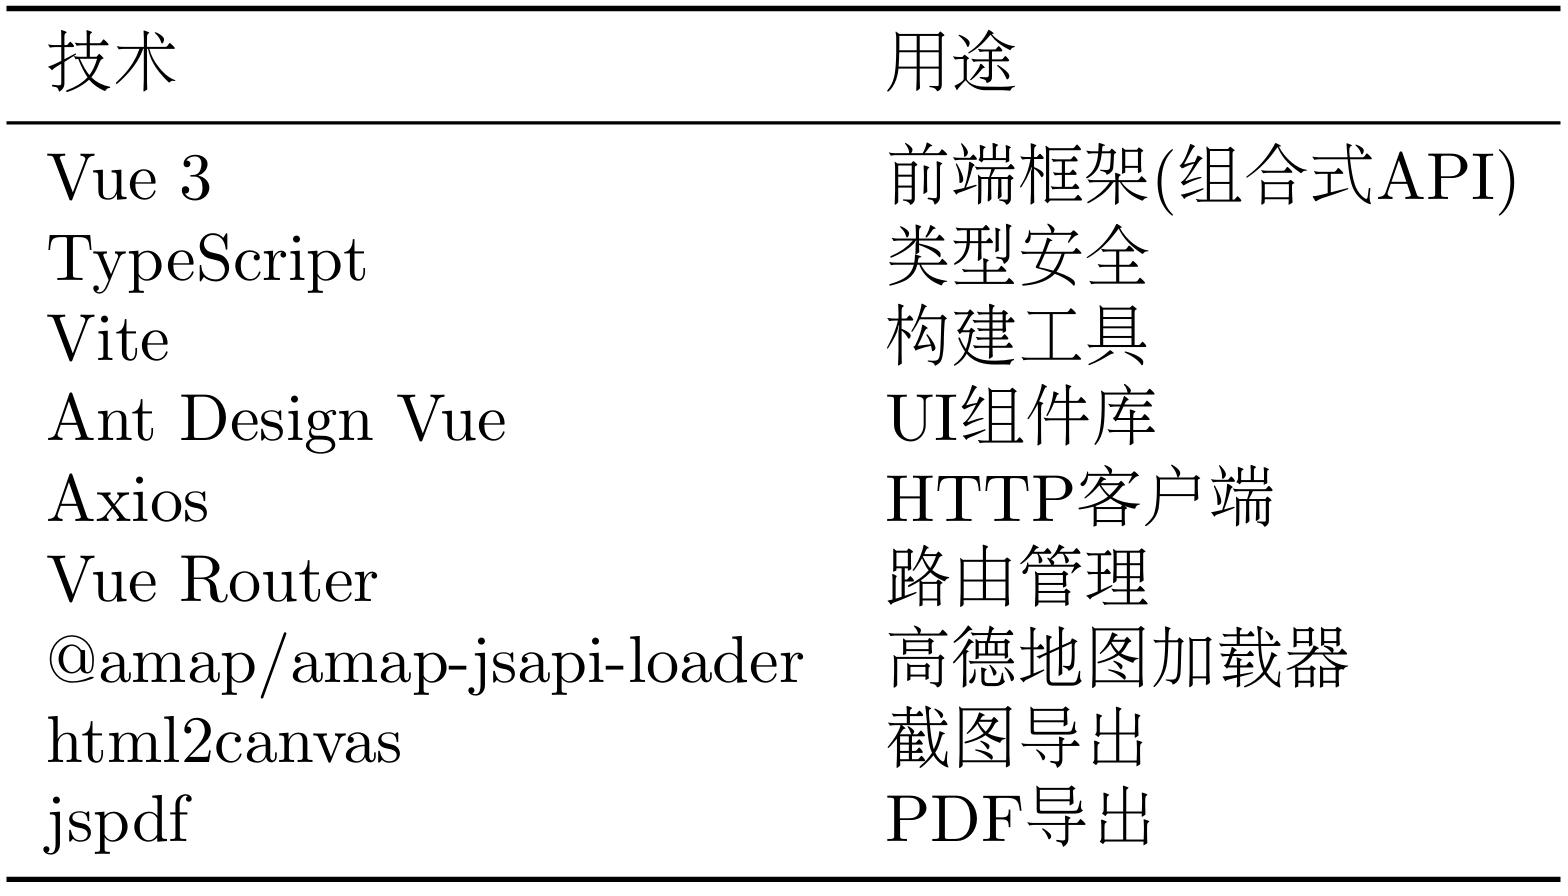
前端技术栈的选择需要考虑几个因素:开发效率、性能、生态系统、学习曲线。如表 13.2 所示,该项目选择了以下技术栈:
表 13.2 前端技术栈
项目的目录结构是这样的:
frontend/
├── src/
│   ├── views/              # 页面组件
│   │   ├── Home.vue        # 首页(表单)
│   │   └── Result.vue      # 结果页
│   ├── services/           # API服务
│   │   └── api.ts
│   ├── types/              # 类型定义
│   │   └── index.ts
│   ├── router/             # 路由配置
│   │   └── index.ts
│   ├── App.vue
│   └── main.ts
├── package.json
├── vite.config.ts
└── tsconfig.json
其中views目录存放页面组件,services目录存放 API 调用逻辑,types目录存放 TypeScript 类型定义,router目录存放路由配置。
13.5.2 类型定义
在 13.2 节中,我们在后端使用 Pydantic 定义了数据模型,比如Location、Attraction、DayPlan、TripPlan等。在前端,我们需要定义对应的 TypeScript 类型。
让我们看看如何定义这些类型。首先是最基础的Location类型,表示经纬度坐标:
// frontend/src/types/index.ts
export interface Location {
  longitude: number
  latitude: number
}
这个类型定义和后端的 Pydantic 模型完全对应。注意 TypeScript 使用interface关键字定义类型,字段类型用冒号分隔,不需要默认值。
接下来是Attraction类型,表示景点信息:
export interface Attraction {
  name: string
  address: string
  location: Location
  visit_duration: number
  description: string
  category?: string
  rating?: number
  image_url?: string
  ticket_price?: number
}
注意这里使用了Location类型作为字段类型,这就是嵌套类型。问号?表示可选字段,对应后端 Pydantic 模型中的Optional。
类似地,我们定义Meal、Hotel、Budget、WeatherInfo等类型。最后是顶层的TripPlan类型:
export interface TripPlan {
  city: string
  start_date: string
  end_date: string
  days: DayPlan[]
  weather_info: WeatherInfo[]
  overall_suggestions: string
  budget?: Budget
}
还有请求类型TripPlanRequest,对应后端的请求模型:
export interface TripPlanRequest {
  city: string
  start_date: string
  end_date: string
  days: number
  preferences: string
  budget: string
  transportation: string
  accommodation: string
}
这些类型定义有什么用呢?首先,当我们调用 API 时,TypeScript 会检查我们传递的数据是否符合TripPlanRequest类型。如果我们不小心把days写成了字符串,TypeScript 会立即报错。其次,当我们接收 API 响应时,TypeScript 会检查响应数据是否符合TripPlan类型。如果后端返回的数据结构发生变化,前端会立即发现。最后,IDE 可以根据类型定义提供代码补全,我们输入tripPlan.时,IDE 会自动列出所有可用的字段。
13.5.3 API 服务封装
有了类型定义,我们就可以封装 API 调用了。我们创建一个api.ts文件,使用 Axios 来发送 HTTP 请求:
import axios from 'axios'
import type { TripPlanRequest,TripPlan } from '../types'

const api = axios.create({
  baseURL: 'http://localhost:8000/api',
  timeout: 120000, // 2分钟超时
  headers: {
    'Content-Type': 'application/json'
  }
})
这里我们创建了一个 Axios 实例,配置了基础 URL、超时时间和请求头。为什么超时时间设置为 2 分钟?因为生成旅行计划需要调用多个 Agent,每个 Agent 都要调用 LLM 和外部 API,整个过程可能需要 10-30 秒。如果超时时间太短,请求会被中断。
接下来我们添加拦截器。拦截器可以在请求发送前和响应接收后执行一些通用逻辑,比如日志记录、错误处理、认证等:
// 请求拦截器
api.interceptors.request.use(
  config => {
    console.log('发送请求:',config)
    return config
  },
  error => Promise.reject(error)
)

// 响应拦截器
api.interceptors.response.use(
  response => {
    console.log('收到响应:',response)
    return response
  },
  error => {
    console.error('请求失败:',error)
    return Promise.reject(error)
  }
)
最后我们定义 API 函数,这是前端调用后端的唯一入口:
// 生成旅行计划
export const generateTripPlan = async (request: TripPlanRequest): Promise<TripPlan> => {
  const response = await api.post<TripPlan>('/trip/plan',request)
  return response.data
}
注意这个函数的类型签名:参数是TripPlanRequest类型,返回值是Promise<TripPlan>类型。这意味着 TypeScript 会检查调用者传递的参数是否符合要求,也会检查返回值的使用是否正确。
13.5.4 Home 表单设计
Home 页面是用户的入口,包含一个表单,让用户填写旅行需求。我们使用 Vue 3 的 Composition API 来组织代码:
<script setup lang="ts">
import { ref } from 'vue'
import { useRouter } from 'vue-router'
import { message } from 'ant-design-vue'
import { generateTripPlan } from '@/services/api'
import type { TripPlanRequest } from '@/types'

const router = useRouter()
const loading = ref(false)
const loadingProgress = ref(0)
const loadingStatus = ref('')

const formData = ref<TripPlanRequest>({
  city: '',
  start_date: '',
  end_date: '',
  days: 3,
  preferences: '历史文化',
  budget: '中等',
  transportation: '公共交通',
  accommodation: '经济型酒店'
})
</script>
这里我们使用ref来创建响应式变量。formData是表单数据,类型是TripPlanRequest。loading表示是否正在加载,loadingProgress表示加载进度,loadingStatus表示加载状态文本。
表单提交的逻辑是这样的:
const handleSubmit = async () => {
  loading.value = true
  loadingProgress.value = 0

  // 模拟进度更新
  const progressInterval = setInterval(() => {
    if (loadingProgress.value < 90) {
      loadingProgress.value += 10
      if (loadingProgress.value <= 30) loadingStatus.value = '🔍 正在搜索景点...'
      else if (loadingProgress.value <= 50) loadingStatus.value = '🌤️ 正在查询天气...'
      else if (loadingProgress.value <= 70) loadingStatus.value = '🏨 正在推荐酒店...'
      else loadingStatus.value = '📋 正在生成行程计划...'
    }
  },500)

  try {
    const response = await generateTripPlan(formData.value)
    clearInterval(progressInterval)
    loadingProgress.value = 100
    router.push({ name: 'result',state: { tripPlan: response } })
  } catch (error) {
    clearInterval(progressInterval)
    message.error('生成计划失败,请重试')
  } finally {
    loading.value = false
  }
}
这段代码做了几件事。首先,设置loading为 true,显示加载状态。然后,启动一个定时器,每 500 毫秒更新一次进度条和状态文本。这是一个模拟的进度,因为我们无法准确知道后端的处理进度。但这样可以让用户知道系统正在工作,而不是卡住了。
接着,调用generateTripPlan函数发送 API 请求。这是一个异步操作,我们使用await等待响应。如果请求成功,清除定时器,设置进度为 100%,然后跳转到结果页面,并把旅行计划数据传递过去。如果请求失败,显示错误消息。最后,无论成功还是失败,都设置loading为 false,隐藏加载状态。
模板部分使用 Ant Design Vue 的组件:
<template>
  <div class="home-container">
    <div class="page-header">
      <h1 class="page-title">✈️ 智能旅行助手</h1>
      <p class="page-subtitle">基于AI的个性化旅行规划</p>
    </div>

    <a-card class="form-card">
      <a-form :model="formData" @finish="handleSubmit">
        <a-form-item label="目的地城市" name="city" :rules="[{ required: true }]">
          <a-input v-model:value="formData.city" placeholder="如:北京" />
        </a-form-item>

        <!-- 更多表单项... -->

        <a-form-item>
          <a-button type="primary" html-type="submit" size="large" :loading="loading">
            开始规划
          </a-button>
        </a-form-item>

        <!-- 加载进度条 -->
        <a-form-item v-if="loading">
          <a-progress :percent="loadingProgress" status="active" />
          <p>{{ loadingStatus }}</p>
        </a-form-item>
      </a-form>
    </a-card>
  </div>
</template>
注意v-model:value指令,它实现了双向数据绑定。当用户在输入框中输入内容时,formData.city会自动更新。当formData.city的值改变时,输入框的内容也会自动更新。
13.5.5 Result 页面展示
Result 页面是整个应用的核心,展示生成的旅行计划。这个页面包含几个部分:行程概览、预算明细、地图可视化、每日行程详情、天气信息。
首先是地图可视化。我们使用高德地图 JS API 在地图上标注景点位置:
import AMapLoader from '@amap/amap-jsapi-loader'

const initMap = async () => {
  const AMap = await AMapLoader.load({
    key: 'your_amap_web_key',
    version: '2.0'
  })

  map = new AMap.Map('amap-container',{
    zoom: 12,
    center: [116.397128,39.916527]
  })

  // 添加景点标记
  tripPlan.value.days.forEach((day) => {
    day.attractions.forEach((attraction,index) => {
      const marker = new AMap.Marker({
        position: [attraction.location.longitude,attraction.location.latitude],
        title: attraction.name,
        label: { content: `${index + 1}`,direction: 'top' }
      })
      map.add(marker)
    })
  })
}
这段代码首先加载高德地图 SDK,然后创建地图实例,最后遍历所有景点,为每个景点创建一个标记(Marker)。标记的位置是景点的经纬度坐标,这些坐标是从后端的Attraction对象中获取的。
导出功能使用html2canvas和jsPDF库。html2canvas可以把 DOM 元素转换成 Canvas,然后我们可以把 Canvas 导出为图片或 PDF:
import html2canvas from 'html2canvas'
import jsPDF from 'jspdf'

// 导出为图片
const exportAsImage = async () => {
  const element = document.getElementById('trip-plan-content')
  const canvas = await html2canvas(element,{ scale: 2 })
  const link = document.createElement('a')
  link.download = `${tripPlan.value.city}旅行计划.png`
  link.href = canvas.toDataURL()
  link.click()
}

// 导出为PDF
const exportAsPDF = async () => {
  const element = document.getElementById('trip-plan-content')
  const canvas = await html2canvas(element,{ scale: 2 })
  const imgData = canvas.toDataURL('image/png')
  const pdf = new jsPDF('p','mm','a4')
  const imgWidth = 210
  const imgHeight = (canvas.height * imgWidth) / canvas.width
  pdf.addImage(imgData,'PNG',0,0,imgWidth,imgHeight)
  pdf.save(`${tripPlan.value.city}旅行计划.pdf`)
}
通过这些前端技术,我们实现了一个完整的 Web 应用。用户可以在浏览器中填写表单,提交请求,等待 AI 生成旅行计划,然后查看详细的行程安排,在地图上看到景点位置,还可以导出为图片或 PDF。整个过程流畅自然,这就是现代 Web 应用的魅力。