在前面的章节中,我们学习了如何使用现有的 MCP 服务。并且也了解到了不同协议的特点。现在,让我们学习如何构建自己的 MCP 服务器。
10.5.1 创建你的第一个 MCP 服务器
(1)为什么要构建自定义 MCP 服务器?
虽然可以直接使用公开的 MCP 服务,但在许多实际应用场景中,需要构建自定义的 MCP 服务器以满足特定需求。
主要动机包括以下几点:
- 封装业务逻辑:将企业内部特有的业务流程或复杂操作封装为标准化的 MCP 工具,供智能体统一调用。
- 访问私有数据:创建一个安全可控的接口或代理,用于访问内部数据库、API 或其他无法对公网暴露的私有数据源。
- 性能专项优化:针对高频调用或对响应延迟有严苛要求的应用场景,进行深度优化。
- 功能定制扩展:实现标准 MCP 服务未提供的特定功能,例如集成专有算法模型或连接特定的硬件设备。
(2)教学案例:天气查询 MCP 服务器
让我们从一个简单的天气查询服务器开始,逐步学习 MCP 服务器开发:
#!/usr/bin/env python3
"""天气查询 MCP 服务器"""

import json
import requests
import os
from datetime import datetime
from typing import Dict, Any
from hello_agents.protocols import MCPServer

# 创建 MCP 服务器
weather_server = MCPServer(name="weather-server", description="真实天气查询服务")

CITY_MAP = {
    "北京": "Beijing", "上海": "Shanghai", "广州": "Guangzhou",
    "深圳": "Shenzhen", "杭州": "Hangzhou", "成都": "Chengdu",
    "重庆": "Chongqing", "武汉": "Wuhan", "西安": "Xi'an",
    "南京": "Nanjing", "天津": "Tianjin", "苏州": "Suzhou"
}


def get_weather_data(city: str) -> Dict[str, Any]:
    """从 wttr.in 获取天气数据"""
    city_en = CITY_MAP.get(city, city)
    url = f"https://wttr.in/{city_en}?format=j1"
    response = requests.get(url, timeout=10)
    response.raise_for_status()
    data = response.json()
    current = data["current_condition"][0]

    return {
        "city": city,
        "temperature": float(current["temp_C"]),
        "feels_like": float(current["FeelsLikeC"]),
        "humidity": int(current["humidity"]),
        "condition": current["weatherDesc"][0]["value"],
        "wind_speed": round(float(current["windspeedKmph"]) / 3.6, 1),
        "visibility": float(current["visibility"]),
        "timestamp": datetime.now().strftime("%Y-%m-%d %H:%M:%S")
    }


# 定义工具函数
def get_weather(city: str) -> str:
    """获取指定城市的当前天气"""
    try:
        weather_data = get_weather_data(city)
        return json.dumps(weather_data, ensure_ascii=False, indent=2)
    except Exception as e:
        return json.dumps({"error": str(e), "city": city}, ensure_ascii=False)


def list_supported_cities() -> str:
    """列出所有支持的中文城市"""
    result = {"cities": list(CITY_MAP.keys()), "count": len(CITY_MAP)}
    return json.dumps(result, ensure_ascii=False, indent=2)


def get_server_info() -> str:
    """获取服务器信息"""
    info = {
        "name": "Weather MCP Server",
        "version": "1.0.0",
        "tools": ["get_weather", "list_supported_cities", "get_server_info"]
    }
    return json.dumps(info, ensure_ascii=False, indent=2)


# 注册工具到服务器
weather_server.add_tool(get_weather)
weather_server.add_tool(list_supported_cities)
weather_server.add_tool(get_server_info)


if __name__ == "__main__":
    weather_server.run()
(3)测试自定义 MCP 服务器
然后创建测试脚本:
#!/usr/bin/env python3
"""测试天气查询 MCP 服务器"""

import asyncio
import json
import sys
import os

sys.path.insert(0, os.path.join(os.path.dirname(__file__), '..', 'HelloAgents'))
from hello_agents.protocols.mcp.client import MCPClient


async def test_weather_server():
    server_script = os.path.join(os.path.dirname(__file__), "14_weather_mcp_server.py")
    client = MCPClient(["python", server_script])

    try:
        async with client:
            # 测试1: 获取服务器信息
            info = json.loads(await client.call_tool("get_server_info", {}))
            print(f"服务器: {info['name']} v{info['version']}")

            # 测试2: 列出支持的城市
            cities = json.loads(await client.call_tool("list_supported_cities", {}))
            print(f"支持城市: {cities['count']} 个")

            # 测试3: 查询北京天气
            weather = json.loads(await client.call_tool("get_weather", {"city": "北京"}))
            if "error" not in weather:
                print(f"\n北京天气: {weather['temperature']}°C, {weather['condition']}")

            # 测试4: 查询深圳天气
            weather = json.loads(await client.call_tool("get_weather", {"city": "深圳"}))
            if "error" not in weather:
                print(f"深圳天气: {weather['temperature']}°C, {weather['condition']}")

            print("\n✅ 所有测试完成!")

    except Exception as e:
        print(f"❌ 测试失败: {e}")


if __name__ == "__main__":
    asyncio.run(test_weather_server())
(4)在 Agent 中使用自定义 MCP 服务器
"""在 Agent 中使用天气 MCP 服务器"""

import os
from dotenv import load_dotenv
from hello_agents import SimpleAgent, HelloAgentsLLM
from hello_agents.tools import MCPTool

load_dotenv()


def create_weather_assistant():
    """创建天气助手"""
    llm = HelloAgentsLLM()

    assistant = SimpleAgent(
        name="天气助手",
        llm=llm,
        system_prompt="""你是天气助手,可以查询城市天气。
使用 mcp_get_weather 工具查询天气,支持中文城市名。
"""
    )

    # 添加天气 MCP 工具
    server_script = os.path.join(os.path.dirname(__file__), "14_weather_mcp_server.py")
    weather_tool = MCPTool(server_command=["python", server_script])

    # 显式展开并注册 MCP 子工具
    expanded_tools = weather_tool.get_expanded_tools()
    if not expanded_tools:
        raise RuntimeError("未发现天气 MCP 子工具,请检查服务脚本、依赖和启动日志。")

    for expanded_tool in expanded_tools:
        assistant.add_tool(expanded_tool)

    return assistant


def demo():
    """演示"""
    assistant = create_weather_assistant()

    print("\n查询北京天气:")
    response = assistant.run("北京今天天气怎么样?")
    print(f"回答: {response}\n")


def interactive():
    """交互模式"""
    assistant = create_weather_assistant()

    while True:
        user_input = input("\n你: ").strip()
        if user_input.lower() in ['quit', 'exit']:
            break
        response = assistant.run(user_input)
        print(f"助手: {response}")


if __name__ == "__main__":
    import sys
    if len(sys.argv) > 1 and sys.argv[1] == "demo":
        demo()
    else:
        interactive()
🔗 连接到 MCP 服务器...
✅ 连接成功!
🔌 连接已断开
✅ 工具 'mcp_get_weather' 已注册。
✅ 工具 'mcp_list_supported_cities' 已注册。
✅ 工具 'mcp_get_server_info' 已注册。

你: 我想查询北京的天气
🔗 连接到 MCP 服务器...
✅ 连接成功!
🔌 连接已断开
助手: 当前北京的天气情况如下:

- 温度:10.0°C
- 体感温度:9.0°C
- 湿度:94%
- 天气状况:小雨
- 风速:1.7米/秒
- 能见度:10.0公里
- 时间戳:2025年10月9日 13:46:40

请注意携带雨具,并根据天气变化适当调整着装。
10.5.2 上传 MCP 服务器
我们创建了一个真实的天气查询 MCP 服务器。现在,让我们将它发布到 Smithery 平台,让全世界的开发者都能使用我们的服务。
(1)什么是 Smithery?
Smithery 是 MCP 服务器的官方发布平台,类似于 Python 的 PyPI 或 Node.js 的 npm。通过 Smithery,用户可以:
- 🔍 发现和搜索 MCP 服务器
- 📦 一键安装 MCP 服务器
- 📊 查看服务器的使用统计和评价
- 🔄 自动获取服务器更新
(2)准备发布
首先,我们需要将项目整理成标准的发布格式,这个文件夹已经在code目录下整理好,可供大家参考:
weather-mcp-server/
├── README.md           # 项目说明文档
├── LICENSE            # 开源许可证
├── Dockerfile         # Docker 构建配置(推荐)
├── pyproject.toml     # Python 项目配置(必需)
├── requirements.txt   # Python 依赖
├── smithery.yaml      # Smithery 配置文件(必需)
└── server.py          # MCP 服务器主文件
需要注意的是,smithery.yaml是 Smithery 平台的配置文件:
name: weather-mcp-server
displayName: Weather MCP Server
description: Real-time weather query MCP server based on HelloAgents framework
version: 1.0.0
author: HelloAgents Team
homepage: https://github.com/yourusername/weather-mcp-server
license: MIT
categories:
  - weather
  - data
tags:
  - weather
  - real-time
  - helloagents
  - wttr
runtime: container
build:
  dockerfile: Dockerfile
  dockerBuildPath: .
startCommand:
  type: http
tools:
  - name: get_weather
    description: Get current weather for a city
  - name: list_supported_cities
    description: List all supported cities
  - name: get_server_info
    description: Get server information
配置说明:
name: 服务器的唯一标识符(小写,用连字符分隔)displayName: 显示名称description: 简短描述version: 版本号(遵循语义化版本)runtime: 运行时环境(python/node)entrypoint: 入口文件tools: 工具列表
pyproject.toml是 Python 项目的标准配置文件,Smithery 要求必须包含此文件,因为后续会打包成一个 server:
[build-system]
requires = ["setuptools>=61.0", "wheel"]
build-backend = "setuptools.build_meta"

[project]
name = "weather-mcp-server"
version = "1.0.0"
description = "Real-time weather query MCP server based on HelloAgents framework"
readme = "README.md"
license = {text = "MIT"}
authors = [
    {name = "HelloAgents Team", email = "xxx"}
]
requires-python = ">=3.10"
dependencies = [
    "hello-agents>=0.2.1",
    "requests>=2.31.0",
]

[project.urls]
Homepage = "https://github.com/yourusername/weather-mcp-server"
Repository = "https://github.com/yourusername/weather-mcp-server"
"Bug Tracker" = "https://github.com/yourusername/weather-mcp-server/issues"

[tool.setuptools]
py-modules = ["server"]
配置说明:
[build-system]: 指定构建工具(setuptools)[project]: 项目元数据name: 项目名称version: 版本号(遵循语义化版本)dependencies: 项目依赖列表requires-python: Python 版本要求
[project.urls]: 项目相关链接[tool.setuptools]: setuptools 配置
虽然 Smithery 会自动生成 Dockerfile,但提供自定义 Dockerfile 可以确保部署成功:
# Multi-stage build for weather-mcp-server
FROM python:3.12-slim-bookworm as base

# Set working directory
WORKDIR /app

# Install system dependencies
RUN apt-get update && apt-get install -y \
    --no-install-recommends \
    && rm -rf /var/lib/apt/lists/*

# Copy project files
COPY pyproject.toml requirements.txt ./
COPY server.py ./

# Install Python dependencies
RUN pip install --no-cache-dir --upgrade pip && \
    pip install --no-cache-dir -r requirements.txt

# Set environment variables
ENV PYTHONUNBUFFERED=1
ENV PORT=8081

# Expose port (Smithery uses 8081)
EXPOSE 8081

# Health check
HEALTHCHECK --interval=30s --timeout=3s --start-period=5s --retries=3 \
    CMD python -c "import sys; sys.exit(0)"

# Run the MCP server
CMD ["python", "server.py"]
Dockerfile 配置说明:
- 基础镜像:
python:3.12-slim-bookworm- 轻量级 Python 镜像 - 工作目录:
/app- 应用程序根目录 - 端口:
8081- Smithery 平台标准端口 - 启动命令:
python server.py- 运行 MCP 服务器
在这里,我们需要 Forkhello-agents仓库,得到code中的源码,并使用自己的 github 创建一个名为weather-mcp-server的仓库,将yourusername改为自己 github 的 Username。
(3)提交到 Smithery
打开浏览器,访问 https://smithery.ai/。使用 GitHub 账号登录 Smithery。点击页面上的 "Publish Server" 按钮,输入你的 GitHub 仓库 URL:https://github.com/yourusername/weather-mcp-server,即可等待发布。
一旦发布完成,可以看到类似这样的页面,如图 10.10 所示:
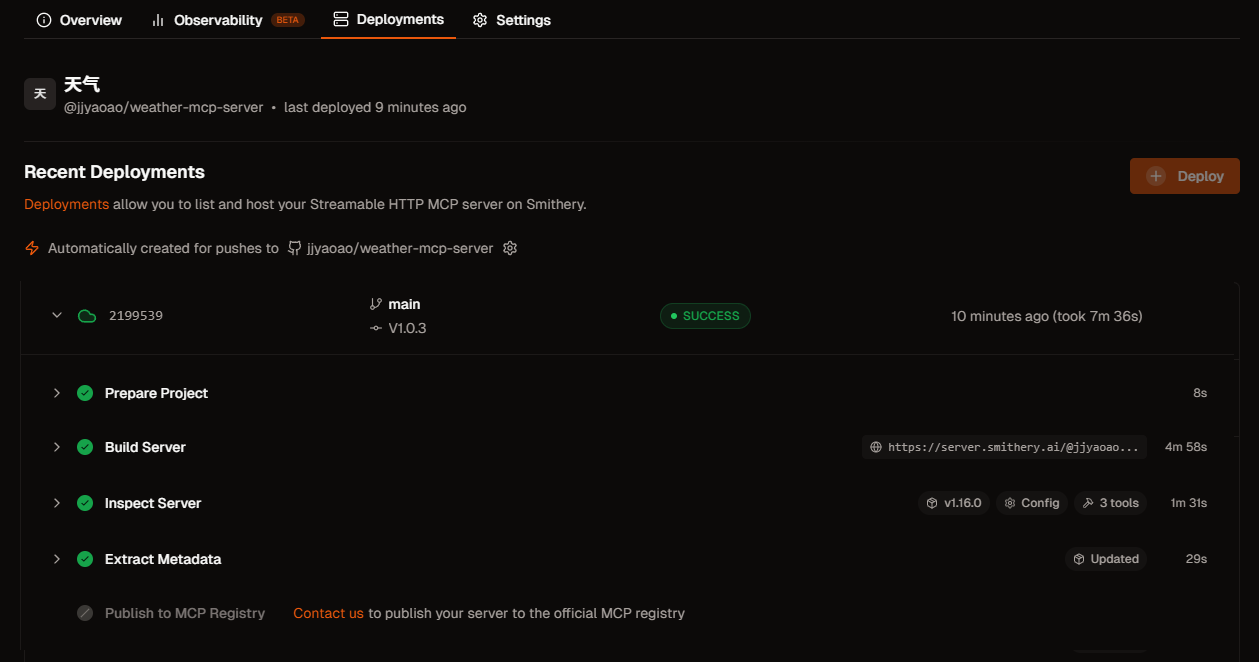
图 10.10 Smithery 发布成功页面
一旦服务器发布成功,用户可以通过以下方式使用:
方式 1:通过 Smithery CLI
# 安装 Smithery CLI
npm install -g @smithery/cli

# 安装你的服务器
smithery install weather-mcp-server
方式 2:在 Claude Desktop 中配置
{
  "mcpServers": {
    "weather": {
      "command": "smithery",
      "args": ["run", "weather-mcp-server"]
    }
  }
}
方式 3:在 HelloAgents 中使用
from hello_agents import SimpleAgent, HelloAgentsLLM
from hello_agents.tools.builtin.protocol_tools import MCPTool

agent = SimpleAgent(name="天气助手", llm=HelloAgentsLLM())

# 使用 Smithery 安装的服务器
weather_tool = MCPTool(
    server_command=["smithery", "run", "weather-mcp-server"]
)
agent.add_tool(weather_tool)

response = agent.run("北京今天天气怎么样?")
当然,这里只是举例,还有更多的用法可以自行探索,下图 10.11 展示了当 MCP 工具发布成功会包含的信息,显示服务的名称“天气”,其唯一标识符 @jjyaoao/weather-mcp-server,以及状态信息。Tools 区域就是我们刚刚实现的方法,Connect 区则提供了连接和使用此服务所需的技术信息,包括服务的接入 URL 地址和多种语言/环境下的配置代码片段。如果想要更加深入了解可以点击这个链接。
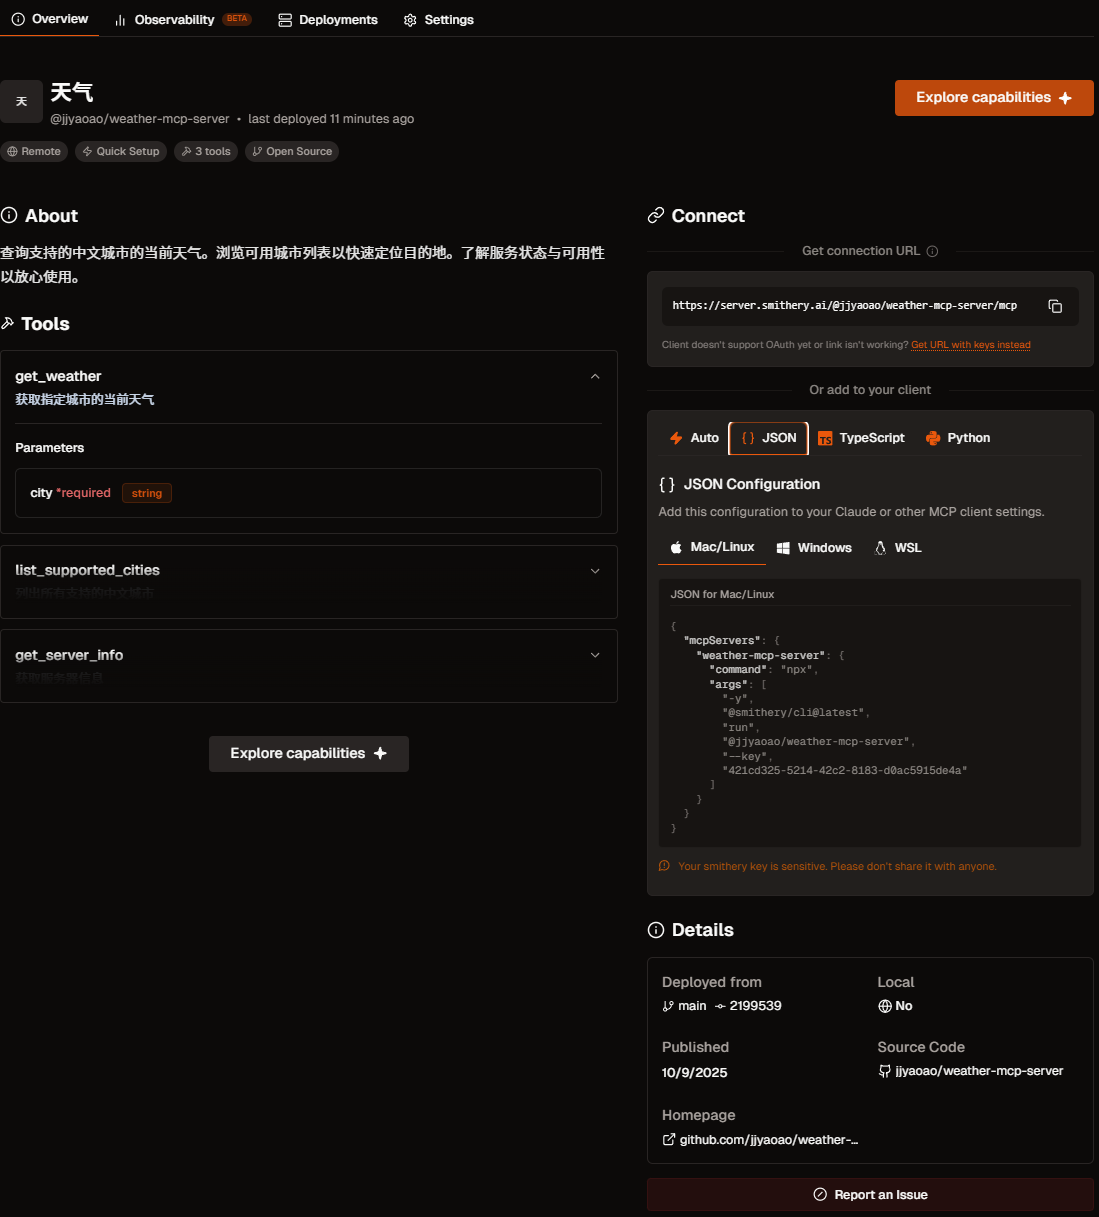
图 10.11 Smithery 发布成功的 MCP 工具
现在是时候去创造你的 MCP 服务器了!